


Rewind Mode (for Printers With the Cutter Option)
NOTE: Cutter and rewind options required.
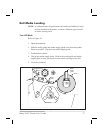
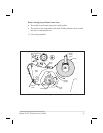
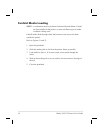
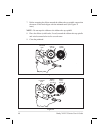
Refer to Figure 20.
1. Remove the rewind plate from its storage location in front of the print
mechanism inside the media compartment.
2. Invert the rewind plate so that the lip on the attached hook plate points
down.
3. Insert the hook plate lip a short distance (½"/13 mm) into the lower
opening in the side plate. Slide in the rewind plate so that it stops
against the printer’s main frame.
4. Insert the two small tabs on the rewind plate into the corresponding
slots in the cutter support bracket. (The rewind plate should spring into
the proper position.)
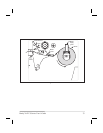
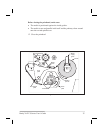
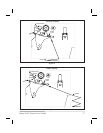
5. Open the printhead.
6. Slide the media guide and media supply guide as far from the printer
frame as possible. Flip down the media supply guide.
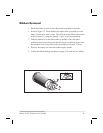
7. Load media as shown.
8. When loading media, allow approximately 36” (914 mm) of media to
extend past the printhead. Remove all labels from this portion to create
a leader.
9. Remove the hook from the rewind spindle. If you are using a core,
slide it onto the rewind spindle until it is flush against the guide plate.
10. Wind the label backing around either the 3” (76 mm) core or the rewind
spindle and reinstall the hook.
11. Flip up the media supply guide. Slide in the media guide and media
supply guide so they just touch, but not restrict, the edge of the roll.
34 Brady X-PLUS Series User’s Guide