


28-14
Catalyst 2960 Switch Software Configuration Guide
78-16881-01
Chapter 28 Configuring Network Security with ACLs
Configuring IPv4 ACLs
After you create an ACL, any additions are placed at the end of the list. You cannot selectively add ACL
entries to a specific ACL. However, you can use no permit and no deny access-list configuration mode
commands to remove entries from a named ACL. This example shows how you can delete individual
ACEs from the named access list border-list:
Switch(config)# ip access-list extended border-list
Switch(config-ext-nacl)# no permit ip host 10.1.1.3 any
Being able to selectively remove lines from a named ACL is one reason you might use named ACLs
instead of numbered ACLs.
After creating a named ACL, you can apply it to interfaces (see the “Applying an IPv4 ACL to an
Interface” section on page 28-17).
Using Time Ranges with ACLs
You can selectively apply extended ACLs based on the time of day and the week by using the time-range
global configuration command. First, define a time-range name and set the times and the dates or the
days of the week in the time range. Then enter the time-range name when applying an ACL to set
restrictions to the access list. You can use the time range to define when the permit or deny statements
in the ACL are in effect, for example, during a specified time period or on specified days of the week.
The time-range keyword and argument are referenced in the named and numbered extended ACL task
tables in the previous sections, the “Creating Standard and Extended IPv4 ACLs” section on page 28-5,
and the “Creating Named Standard and Extended ACLs” section on page 28-12.
Time-based access lists trigger CPU activity because the new configuration of the access list must be
merged with other features and the combined configuration loaded into the TCAM. For this reason, you
should be careful not to have several access lists configured to take affect in close succession (within a
small number of minutes of each other.)
Note The time range relies on the switch system clock; therefore, you need a reliable clock source. We
recommend that you use Network Time Protocol (NTP) to synchronize the switch clock. For more
information, see the “Managing the System Time and Date” section on page 6-1.
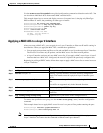
Beginning in privileged EXEC mode, follow these steps to configure a time-range parameter for an ACL:
Command Purpose
Step 1
configure terminal Enter global configuration mode.
Step 2
time-range time-range-name Assign a meaningful name (for example, workhours) to the time range to
be created, and enter time-range configuration mode. The name cannot
contain a space or quotation mark and must begin with a letter.
Step 3
absolute [start time date]
[end time date]
or
periodic day-of-the-week hh:mm to
[day-of-the-week] hh:mm
or
periodic {weekdays | weekend | daily}
hh:mm to hh:mm
Specify when the function it will be applied to is operational.
• You can use only one absolute statement in the time range. If you
configure more than one absolute statement, only the one configured
last is executed.
• You can enter multiple periodic statements. For example, you could
configure different hours for weekdays and weekends.
See the example configurations.
Step 4
end Return to privileged EXEC mode.