


74-105
Cisco ASA 5500 Series Configuration Guide using the CLI
Chapter 74 Configuring Clientless SSL VPN
Configuring Browser Access to Client-Server Plug-ins
Preparing the Security Appliance for a Plug-in
Before installing a plug-in, prepare the ASA by performing the following steps:
Step 1 Make sure clientless SSL VPN (“webvpn”) is enabled on an ASA interface.
Step 2 Install an SSL certificate onto the ASA interface to which remote users use a fully-qualified domain
name (FQDN) to connect.
Note Do not specify an IP address as the common name (CN) for the SSL certificate. The remote user
attempts to use the FQDN to communicate with the ASA. The remote PC must be able to use
DNS or an entry in the System32\drivers\etc\hosts file to resolve the FQDN.
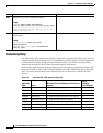
Configuring the ASA to Use the New HTML File
Follow these steps to configure the ASA to use the new HTML file you just customized in the previous
steps.
Detailed Steps
Command Purpose
Step 1
import webvpn webcontent
Example:
hostname# import webvpn webcontent
/+CSCOU+/login.inc tftp://209.165.200.225/login.inc
!!!!* Web resource `+CSCOU+/login.inc' was
successfully initialized
hostname#
Imports the file and images as Web Content.
Step 2
export webvpn customization
Example:
hostname2# export webvpn customization template
tftp://209.165.200.225/sales_vpn_login
!!!!!!!!!!!!!!!!!!!!!!!!!!!!!!!!!!!!!!!!!!!!!!!
%INFO: Customization object 'Template' was exported
to tftp://10.21.50.120/sales
_vpn_login
Exports a customization template.
Step 3
Change the full customization mode tag in the file to enable
Example:
<full-customization>
<mode>enable</mode>
<url>/+CSCOU+/login.inc</url>
</full-customization>
Supplies the URL of the login file stored in the ASA
memory.