82-9
Cisco ASA 5500 Series Configuration Guide using the CLI
Chapter 82 Troubleshooting
Performing Password Recovery
• Disabling Password Recovery, page 82-10
• Resetting the Password on the SSM Hardware Module, page 82-11
Recovering Passwords for the ASA
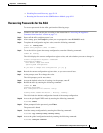
To recover passwords for the ASA, perform the following steps:
Step 1 Connect to the ASA console port according to the instructions in “Accessing the Appliance
Command-Line Interface” section on page 2-1.
Step 2 Power off the ASA, and then power it on.
Step 3 After startup, press the Escape key when you are prompted to enter ROMMON mode.
Step 4 To update the configuration register value, enter the following command:
rommon #1> confreg 0x41
Update Config Register (0x41) in NVRAM...
Step 5 To set the ASA to ignore the startup configuration, enter the following command:
rommon #1> confreg
The ASA displays the current configuration register value, and asks whether you want to change it:
Current Configuration Register: 0x00000041
Configuration Summary:
boot default image from Flash
ignore system configuration
Do you wish to change this configuration? y/n [n]: y
Step 6 Record the current configuration register value, so you can restore it later.
Step 7 At the prompt, enter Y to change the value.
The ASA prompts you for new values.
Step 8 Accept the default values for all settings. At the prompt, enter Y.
Step 9 Reload the ASA by entering the following command:
rommon #2> boot
Launching BootLoader...
Boot configuration file contains 1 entry.
Loading disk0:/asa800-226-k8.bin... Booting...Loading...
The ASA loads the default configuration instead of the startup configuration.
Step 10 Access the privileged EXEC mode by entering the following command:
hostname# enable
Step 11 When prompted for the password, press Enter.
The password is blank.
Step 12 Load the startup configuration by entering the following command:
hostname# copy startup-config running-config
Step 13 Access the global configuration mode by entering the following command:
hostname# configure terminal


