


4-23
Cisco CSR 1000V Series Cloud Services Router Software Configuration Guide
OL-27477-07
Chapter 4 Installing the Cisco CSR 1000V in VMware ESXi Environments
Manually Creating the VM and Installing the Cisco CSR 1000V Software Using the .iso File (VMware ESXi)
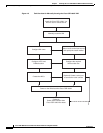
Manually Creating the Cisco CSR 1000V VM Using the .iso File (VMware ESXi)
The following steps are performed using VMware VSphere.
While the following procedure provides general guidance for how to deploy the Cisco CSR 1000V, the
exact steps that you need to perform may vary depending on the characteristics of your VMware
environment and setup. The steps and screen displays in this procedure are based on VMware ESXi 5.0.
Step 1 Download the CSR1000_esxi.iso file from the Cisco CSR 1000V software installation image package
and copy it onto the VM Datastore.
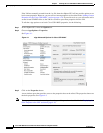
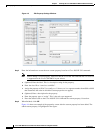
Step 2 In the VSphere client, select Create a New Virtual Machine option.
Step 3 Under Configuration, select the option to create a Custom configuration, and click Next.
Step 4 Under Name and Location, specify the name for the VM and click Next.
Step 5 Under Storage, select the datastore to use for the VM. Click Next.
Step 6 Under Virtual Machine Version, select Virtual Machine Version 8. Click Next.
Note The Cisco CSR 1000V is not compatible with ESXi Server versions prior to 5.0.
Step 7 Under Guest Operating System, select Linux and the “Other 2.6x Linux (64-bit) setting” from the
drop-down menu. Click Next.
Step 8 Under CPUs, select the following settings:
• Number of virtual sockets (virtual CPUs)
• Number of cores per virtual socket
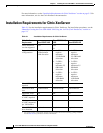
See the “Installation Requirements for VMware ESXi” section on page 4-9 for the supported number of
virtual CPUs and the corresponding required RAM allocation for your release.
Click Next.
Step 9 Under Memory, configure the supported memory size for your Cisco CSR 1000V release. See the
“Installation Requirements for VMware ESXi” section on page 4-9 for the supported number of virtual
CPUs and the corresponding required RAM allocation for your release.
Click Next.
Step 10 Under Network, allocate at least three virtual network interface cards (vNICs).
a. Select the number of vNICs that you want to connect from the drop-down menu.
Note The VMware ESXi 5.0 interface only allows the creation of 4 vNICS during the initial VM
creation. You can add more vNICs after the VM is created and the Cisco CSR 1000V is first
booted.
b. Add the vNICs.
–
Select a different network for each vNIC.
–
Select the adapter type from the drop-down menu. See the requirements table in the “Installation
Requirements for VMware ESXi” section on page 4-9 for the supported adapter type in your
release.
c. Select all vNICs to connect at power-on.