


5-3
Cisco CSR 1000V Series Cloud Services Router Software Configuration Guide
OL-27477-07
Chapter 5 Installing the Cisco CSR 1000V in Citrix XenServer Environments
Manually Creating the Cisco CSR 1000V VM Using the .iso File (Citrix XenServer)
Manually Creating the Cisco CSR 1000V VM Using the .iso File
(Citrix XenServer)
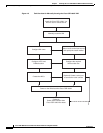
While the following procedure provides a general guideline for how to manually create the VM for the
Cisco CSR 1000V, the exact steps that you need to perform may vary depending on the characteristics
of your Citrix XenServer environment and setup. For more information, see the Citrix XenServer
documentation.
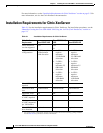
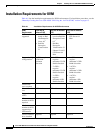
See Table 5-1 on page 5-2 for the requirements to install the Cisco CSR 1000V on a Citrix XenServer
VM.
Note The Cisco CSR 1000V does not support deploying the OVA file in KVM environments.
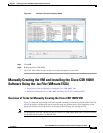
The following steps are performed using the Citrix XenCenter console.
Step 1 Download the .iso file from the Cisco CSR 1000V software installation image package and copy it onto
a local or network device.
Step 2 In the Citrix XenCenter console, to create a new VM, select the server, and click New VM.
The Select a VM template screen displays.
Step 3 Click Template. Scroll through the templates and select Other Install Media.
Click Next.
Step 4 In the Name field, enter the name of the VM.
Step 5 When prompted for the installation media, choose from one of the following:
• Install from the ISO library or DVD drive
• Boot from network
Click Next.
Step 6 Select the server where the VM will be placed.
Select the checkbox for Place the VM on the server. Click Next.
Step 7 Enter the number of vCPUs and memory settings.
See Table 5-1 on page 5-2 for the supported number of vCPUs and memory requirements for your
release.
Click Next.
Step 8 Add the virtual disks by inputting the following fields:
• Enter the description (optional).
• Select the virtual disk size from the pull-down menu. See Table 5-1 on page 5-2 for the required disk
size for your release.
• Enter the location of the virtual disk.
Click Add and then click Next.
Step 9 On the Networking screen, select the networks that will connect to the Cisco CSR 1000V through the
vNICs.