


Task 1Enabling SNMP in a Cisco IOS Device
About Enabling SNMP
"
Basic Dial NMS Implementation Guide
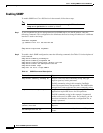
Enabling SNMP
To enable SNMP on a Cisco IOS device in the network, follow these steps.
Note
In some software releases, the commands
snmp-server engineID local
and
snmp-server packetsize
are enabled by default.
Step 1
To use Loopback0 for device management and set SNMP traps to use that IP address, enter the
following commands. This configuration also eliminates the need to change IP addresses if a different
interface is used to send traps.
!
interface Loopback0
ip address 172.21.10.1 255.255.255.255
!
!
snmp-server trap-source Loopback0
!
Step 2
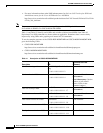
To enable a basic SNMP configuration, enter the following commands. See Table 13 for descriptions of
each command.
snmp-server community 5urf5h0p RO
snmp-server community 5crapmeta1 RW
snmp-server location Lake Travis (Austin) Dial POP
snmp-server contact net-admin@aurora.the.net
snmp-server enable traps
snmp host 172.23.10.1 traps SNMPv1
Table 13 SNMP Command Descriptions
Command Purpose
snmp-server community 5urf5h0p RO
Assigns a read only (RO) community string. Only get
requests (queries) can be performed.
The RO community string in this example (5urf5h0p)
allows Get requests but no Set operations. The NMS and the
managed device must reference the same community string.
snmp-server community 5crapmeta1 RW
Assigns a read write (RW) community string. SNMP
applications require RW access for Set operations.
The RW community string in this example (5crapmeta1)
enables write access to OID values. For example, you can
shut down an interface, download a configuration file, or
change a password.
snmp-server location Lake Travis
(Austin) Dial POP
Specifies the location of the device for administrative
purposes.
snmp-server contact admin
net-admin@aurora.the.net
Specifies a contact name to notify whenever a MIB problem
occurs.