


22
Catalyst 6500 Series Switch and Cisco 7600 Series Router CMM Installation and Verification Note
78-14107-07
Removing and Replacing Port Adapters
Caution Using the screws or standoffs to seat the port adapter could warp the port adapter. Before you install and
tighten the securing screws, ensure that the port adapter is fully seated by visually verifying that the
bottom of the port adapter is in contact with the top of the mounting posts.
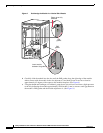
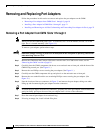
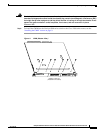
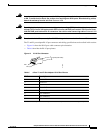
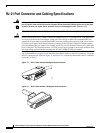
Step 8 Install the two standoffs and two Phillips screws to secure the port adapter. (See Figure 12.)
Step 9 Carefully turn the CMM component-side down, and place it on the antistatic mat or foam pad.
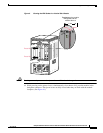
Step 10 Install the two remaining Phillips screws. (See Figure 11.)
Step 11 Install the CMM into the Catalyst 6500 series switch or the Cisco 7600 series router; see the “Installing
the CMM” section on page 9.
Installing and Removing an Ad-Hoc Conferencing and Transcoding Port
Adapter in Slot 4
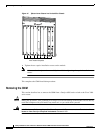
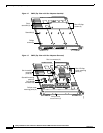
Note The ad-hoc conferencing and transcoding port adapter is the only port adapter that can be installed in
slot 4. Slot 4 is located internally. (See Figure 13.)
Warning
Hazardous voltage or energy is present on the backplane when the system is operating. Use caution
when servicing. Statement 1034
Follow these procedures to remove and install an ad-hoc conferencing and transcoding port adapter in
slot 4:
• Removing an Ad-hoc Conferencing and Transcoding Port Adapter in Slot 4, page 22
• Installing an Ad-Hoc Conferencing and Transcoding Port Adapter in Slot 4, page 23
Removing an Ad-hoc Conferencing and Transcoding Port Adapter in Slot 4
To remove a port adapter in CMM slot 4, perform these steps:
Step 1 Remove the CMM from the Catalyst 6500 series switch or Cisco 7600 series router; see the “Removing
the CMM” section on page 16.
Step 2 Carefully place the CMM, component side up, on an antistatic mat or foam pad, with the front of the
CMM facing toward you.
Step 3 In Figure 13, note the location of the two slot 4 Phillips screw mounting posts. Remove the two Phillips
screws that secure the right-hand side of the port adapter.