14
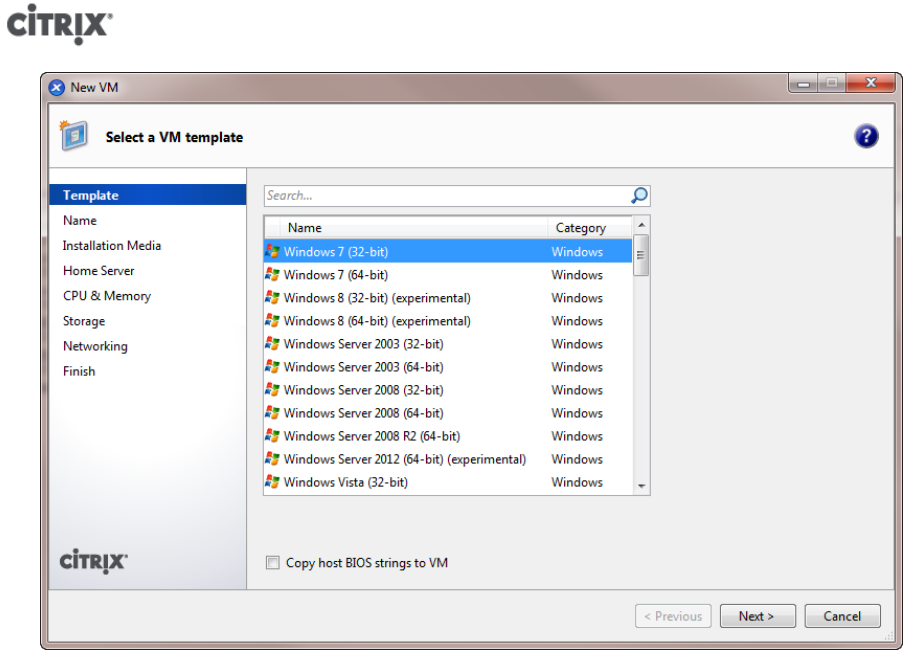
2. Select a VM template and click Next.
Each template contains the setup information needed to create a new VM with a specific guest operating
system (OS), and with optimum storage. This list reflects the templates that XenServer currently supports.
Note:
If the OS that you intend to install on your new VM is compatible only with the original
hardware (for example, an OS installation CD that was packaged with a specific computer),
check the Copy host BIOS strings to VM box.
3. Enter a name for and optional description of the new VM.
4. Choose the source of the OS media to install on the new VM.
Installing from a CD/DVD is the simplest option for getting started. To do so, choose the default installation
source option (DVD drive), insert the disk into the DVD drive of the XenServer host, and choose Next to
proceed.
XenServer also allows you to pull OS installation media from a range of sources, including a pre-existing ISO
library. An ISO image is a file that contains all the information that an optical disc (CD, DVD, and so on) would
contain. In this case, an ISO image would contain the same OS data as a Windows installation CD.
To attach a pre-existing ISO library, click New ISO library and indicate the location and type of ISO library.
You can then choose the specific operating system ISO media from the drop-down list.
5. The VM will run on the installed host. Choose Next to proceed.
6. Allocate processor and memory resources.
For a Windows 7 VM, the default is 1 virtual CPU and 2048 MB of RAM. You may also choose to modify the
defaults. Select Next to continue.
Note:
Each OS will have different configuration requirements which will be reflected in the
templates.


