


Removing and Replacing Parts: Dell Precision Workstation 470 and 670 Computers User's Guide
file:///T|/htdocs/systems/ws670/EN/ug_en/before.htm[3/20/2013 9:31:52 AM]
Back to Contents Page
Removing and Replacing Parts
Dell Precision™ Workstation 470 and 670 Computers User's Guide
Before You Begin
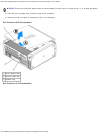
Opening the Computer Cover
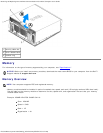
Memory
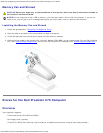
Drives for the Dell Precision 670 Computer
Drive Door for the Dell Precision 670
Computer
Drives for the Dell Precision 470 Computer
Cards
Processor Airflow Shroud
Processor
Battery
VRM
Control Panel
Front Panel
I/O Panel
Power Supply for the Dell Precision 670
Computer
Power Supply for the Dell Precision 470
Computer
System Board
Closing the Computer Cover
Before You Begin
This chapter provides procedures for removing and installing the components in your computer. Unless otherwise noted, each
procedure assumes that the following conditions exist:
You have performed the steps in "Turning Off Your Computer" and "Before Working Inside Your Computer."
You have read the safety information in your Dell™ Product Information Guide.
A component can be replaced by performing the removal procedure in reverse order.
Recommended Tools
The procedures in this document may require the following tools:
Small flat-blade screwdriver
Phillips screwdriver
Flash BIOS update program floppy disk or CD
Turning Off Your Computer
NOTICE: To avoid losing data, save and close any open files and exit any open programs before you turn off your
computer.
1. Shut down the operating system:
a. Save and close any open files, exit any open programs, click the Start button, and then click Turn Off
Computer.
b. In the Turn off computer window, click Turn off.