


100 Adding and Replacing Parts
NOTICE: Only a certified service technician should perform repairs on your computer. Damage due to servicing
that is not authorized by Dell is not covered by your warranty.
NOTICE: When you disconnect a cable, pull on its connector or on its pull-tab, not on the cable itself. Some cables
have a connector with locking tabs; if you are disconnecting this type of cable, press in on the locking tabs before
you disconnect the cable. As you pull connectors apart, keep them evenly aligned to avoid bending any connector
pins. Also, before you connect a cable, ensure that both connectors are correctly oriented and aligned.
NOTICE: To avoid damaging the computer, perform the following steps before you begin working inside the computer.
1
Ensure that the work surface is flat and clean to prevent the computer cover from being scratched.
2
Turn off your computer (see "Turning Off Your Computer" on page 99).
NOTICE: To disconnect a network cable, first unplug the cable from your computer and then unplug it from the
network wall connector.
3
Disconnect any telephone or network cables from the computer.
4
Disconnect your computer and all attached devices from their electrical outlets.
NOTICE: To avoid damaging the system board, you must remove the main battery before you service the computer.
5
Remove the battery (see "Replacing the Battery" on page 33).
6
Press the power button to ground the system board.
7
Remove any installed ExpressCards or PC Cards (see "Removing a Card or Blank" on page 57).
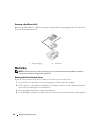
Hard Drive
CAUTION: If you remove the hard drive from the computer when the drive is hot,
do not touch
the metal housing
of the hard drive.
CAUTION: Before you begin any of the procedures in this section, follow the safety instructions in the
Product
Information Guide
.
NOTICE: To prevent data loss, turn off your computer before removing the hard drive. Do not remove the hard drive
while the computer is turned on, in standby mode, or in hibernate mode.
NOTICE: Hard drives are extremely fragile; even a slight bump can damage the drive.
NOTE: Dell does not guarantee compatibility or provide support for hard drives from sources other than Dell.
NOTE: If you are installing a hard drive from a source other than Dell, you need to install an operating system,
drivers, and utilities on the new hard drive.
1
Follow the procedures in "Before You Begin" on page 99.
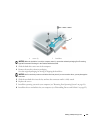
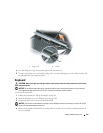
2
Turn the computer upside-down, and remove the two screws that secure the hard drive carrier to the
chassis.