


Using the Printer 37
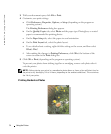
Copying Photos Without a Computer
1 Load the photo paper with the print (glossy) side facing up. For more information, see
"Loading Paper" on page 28.
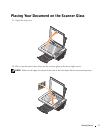
2 Open the top cover.
3 Place your photo on the scanner glass and make sure the upper left corner aligns with the
arrow on the printer. For more information, see "Placing Your Document on the Scanner
Glass" on page 31.
NOTE: For best results, install a photo cartridge before copying photos.
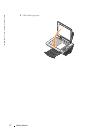
4
Close the top cover.
5 Select the copy quality. For more information, see "Operator Panel Menus" on page 18.
6 Press the Color button.
Copying Photos Using Your Computer
1 Turn on your computer and printer, and make sure they are connected.
2 Load the photo paper with the print (glossy) side facing up. For more information, see
"Loading Paper" on page 28.
3 Place your photo on the scanner glass and make sure the upper left corner aligns with the
arrow on the printer. For more information, see "Placing Your Document on the Scanner
Glass" on page 31.
NOTE: For best results, install a photo cartridge before copying photos.
4 Click Start→ Programs or All Programs→Dell Printers→Dell Photo AIO Printer
942→Dell All-In-One Center.
The Dell All-In-One Center appears.
5 Click Preview Now.
6 Adjust the dotted lines to fit around the portion of the image you want to print.
7 In the Copy section, select Photo.
8 Select a copy quantity and color.
9 To customize your photo, click See More Copy Settings.
NOTE: For more copy settings, see "Changing Copy Settings" on page 37.
10 When you finish customizing your settings, click Copy Now.