


Back to Contents Page
Memory
Dell™OptiPlex™FX160/160ServiceManual
Removing a Memory Module
Replacing a Memory Module
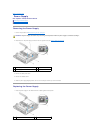
Your computer supports one or two memory modules.
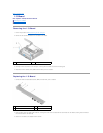
Removing a Memory Module
1. Perform the procedure in Before Working on Your Computer.
2. Carefully spread apart the securing clips on each end of the memory module connector until the memory module pops out.
3. Remove the memory module from the connector.
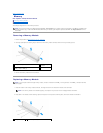
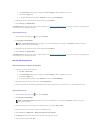
Replacing a Memory Module
1. Place the module in the memory module connector, and align the notch in the module with the tab on the connector.
2. Press down on the module until the securing clips lock into place. If the clips do not click into place, remove the module and reinstall it.
.
NOTE: Your computer supports non-ECC, 667 MHz or 800 MHz, DDR2 SDRAM only. It supports memory module sizes of 512 MB (for embedded Linux
operating systems only), 1 GB, and 2 GB. When 800 MHz memory is installed, your computer operates at 667 MHz. See support.dell.com for more
information.
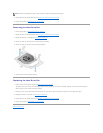
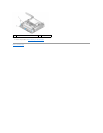
1
DIMM_1 memory connector
2
DIMM_2 memory
connector
3
securing clip (two per connector, white –
DIMM_1, black – DIMM_2)
NOTE: If your computer contains a single memory module, it must be inserted in the DIMM_1 memory connector. The DIMM_1 connector has white
securing clips.
NOTE: If the memory module is not installed properly, the computer may not boot. No error message indicates this failure.
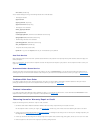
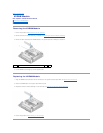
1
DIMM_1 memory
2
tab in memory connector