


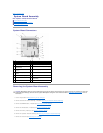


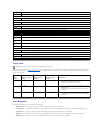


Changing Boot Sequence for Future Boots
When establishing the boot sequence, first establish the boot order of devices within device type groups, then select the boot order of device types.
1. Enter the BIOS Setup Utility (see Entering the BIOS Setup Utility).
2. Use the left- and right-arrow keys to navigate to the System screen.
3. Use the down-arrow key to highlight Boot Sequence, and press <Enter> to open the sub screen.
4. Set up the boot priority of devices in device types:
a. Use the down- and up-arrow keys to highlight Removable Drives and press <Enter>. If a drive is not installed, press <Esc> to return to the Boot
Sequence sub screen.
b. On the Removable Drives screen, use the up- and down- arrow keys to highlight 1st Drive, and then press <Enter>.
c. In the Options pop-up window, use the up- and down-arrow keys to highlight the preferred first removable device, or select Off to disable it, and
then press <Enter>. Repeat this sub-step for the 2nd, 3rd, etc. Drives, if listed. Press <Esc> to return to the Boot Sequence sub screen.
d. Repeat this step for each of the remaining device types: Hard Disk Drives, USB Drives, CD/DVD Drives, and Network Drives.
5. Set up the boot priority of device types:
a. On the Boot Sequence sub screen, use the up- and down-arrow keys to highlight 1st Boot Device, and press <Enter> to open the Options pop-
up window.
b. In the Options pop-up window, use the up- and down-arrow keys to highlight the preferred 1st Boot Device type, and press <Enter>. The 1st
Boot Device is the primary device type to boot from.
c. Repeat this step for the 2nd, 3rd, 4th, and 5th Boot Devices to establish the boot sequence order of device types the computer will attempt to
boot from.
6. Press <F10> and then press <Enter> to save your settings and reboot your system.
Select Specific Boot Device
During system startup, you can select any bootable device, such as an internal or external hard drive, an external CD or DVD drive, USB memory key, or
external floppy drive, without changing the boot device sequence in the BIOS. This feature is useful when booting to an external DVD drive to run Dell
Diagnostics from the Dell Drivers and Utilities media, and returning to your normal boot sequence during the next system startup.
1. Turn on (or restart) your computer.
2. When the Dell logo appears, promptly press <F12> repeatedly until the Boot Device Menu appears.
If you wait too long and the operating system logo appears, continue to load the system until you see the operating system desktop. Then shut down
your computer and try again.
3. Use the up- and down-arrow keys to select the device you want to boot to, and then press <Enter>.
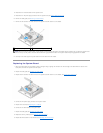
Clearing Forgotten Passwords
1. Perform the procedure in Before Working on Your Computer.
2. Remove the jumper from the password jumper (PSWD) pins on the system board (see System Board Connectors).
3. Perform the procedure in After Working on Your Computer.
4. Restart your computer and allow it to boot to the operating system desktop.
5. Shut down your computer.
6. Perform the procedure in Before Working on Your Computer.
NOTE: Write down your current boot sequence in case you want to restore it.
WARNING: Before working inside your computer, read the safety information that shipped with your computer. For additional safety best
practices information, see the Regulatory Compliance Homepage at www.dell.com/regulatory_compliance.
CAUTION: This process erases both the system and administrator passwords.