


l Reseat the power cable in the power connector on the back of the computer and the electrical outlet.
l Bypass power strips, power extension cables, and other power protection devices to verify that the computer turns on properly.
l Ensure that any power strips being used are plugged into an electrical outlet and are turned on.
l Ensure that the electrical outlet is working by testing it with another device, such as a lamp.
l Ensure that the 12V power cable and front panel cable are securely connected to the system board (see System Board Connectors).
If the power light is steady amber — A device may be malfunctioning or incorrectly installed.
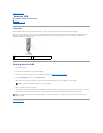
l Remove and then reinstall all memory modules (see Memory).
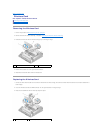
l Remove and then reinstall the NVRAM module, if installed (see NVRAM Module).
l Remove and then reinstall the wireless card, if installed (see Wireless Card).
Eliminate interference — Some possible causes of interference are:
l Power, keyboard, and mouse extension cables
l Too many devices connected to the same power strip
l Multiple power strips connected to the same electrical outlet
Printer Problems
Check the printer documentation — See the printer documentation for setup and troubleshooting information.
Ensure that the printer is turned on
Check the printer cable connections —
l See the printer documentation for cable connection information.
l Ensure that the printer cables are securely connected to the printer and the computer.
Test the electrical outlet — Ensure that the electrical outlet is working by testing it with another device, such as a lamp.
Verify that the printer is recognized by Windows —
Windows XP and Windows XP Embedded:
1. Click Start® Control Panel
2. If the Control Panel window appears in Category View (Pick a category), switch to Classic View (icon view).
3. Double-click Printers and Faxes.
4. If the printer is listed, right-click the printer icon.
5. Click Properties® Ports. For a USB printer connected directly to your computer, ensure that the Print to the following port(s): setting is USB.
Windows Vista:
1. Click Start ® Control Panel® Hardware and Sound® Printer.
2. If the printer is listed, right-click the printer icon.
3. Click Properties® Ports.
4. Adjust the settings, as needed.
WARNING: Before working inside your computer, read the safety information that shipped with your computer. For additional safety best
practices information, see the Regulatory Compliance Homepage at www.dell.com/regulatory_compliance.
NOTE: If you need technical assistance for your printer, contact the printer's manufacturer.