


Back to Contents Page
Processor Heat-Sink Fan
Dell™Inspiron™One2305/2310ServiceManual
Removing the Processor Heat-Sink Fan
Replacing the Processor Heat-Sink Fan
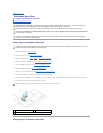
Removing the Processor Heat-Sink Fan
1. Follow the instructions in Before You Begin.
2. Remove the back cover (see Removing the Back Cover).
3. Follow the instructions from step 2 to step 5 in Removing the Front Stand.
4. Remove the system-board shield (see Removing the System-Board Shield).
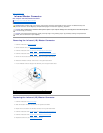
5. Disconnect the processor heat-sink fan cable from the connector (CPU FAN) on the system board.
6. Remove the two screws that secure the processor heat-sink fan to the chassis.
7. Carefully peel the silver foil from the processor heat sink.
8. Lift the processor heat-sink fan along with its cable away from the chassis.
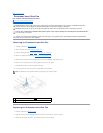
Replacing the Processor Heat-Sink Fan
1. Follow the instructions in Before You Begin.
2. Align the screw holes on the processor heat-sink fan with the screw holes on the hex nut screws.
3. Replace the two screws that secure the processor heat-sink fan to the chassis.
WARNING: Before working inside your computer, read the safety information that shipped with your computer. For additional safety best
practices information, see the Regulatory Compliance Homepage at www.dell.com/regulatory_compliance.
WARNING: The heat sink may be very hot during normal operation. Ensure that it has had sufficient time to cool before you touch it.
CAUTION: Onlyacertifiedservicetechnicianshouldperformrepairsonyourcomputer.DamageduetoservicingthatisnotauthorizedbyDell™
is not covered by your warranty.
CAUTION: To avoid electrostatic discharge, ground yourself by using a wrist grounding strap or by periodically touching an unpainted metal
surface (such as a connector on your computer).
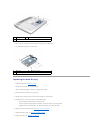
NOTE: The appearance of the system board may vary based on your computer model.
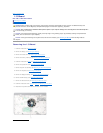
1
processor heat-sink fan cable
2
processor heat-sink fan
3
screws (2)