78 Installing System Components
10
Reconnect the system to its electrical outlet and turn the system on,
including any attached peripherals.
11
Enter the System Setup program and ensure that the hard drive’s
controller is enabled. See "Entering the System Setup Program" on
page 36.
12
Exit the System Setup program and reboot the system.
13
Partition and logically format the drive.
See the documentation that came with the drive for instructions on installing
any software required for drive operation.
Expansion-Card Stabilizer
Removing the Expansion-Card Stabilizer
1
Turn off the system and attached peripherals. Disconnect the system from
the electrical outlet and peripherals.
2
Open the system. See "Opening the System" on page 59.
3
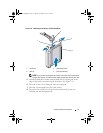
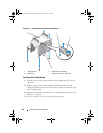
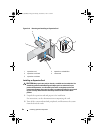
Press the release tab and lift the expansion card stabilizer out of slots in the
chassis. See Figure 3-15.
Installing the Expansion-Card Stabilizer
1
Slide the edge of the expansion-card stabilizer into the slots in the cooling
shroud and chassis until the release tab locks into place. See Figure 3-15.
2
Close the system. See "Closing the System" on page 60.
Cooling Shroud
The cooling shroud directs airflow over the system processor and memory
modules.
WARNING: The memory modules and heat sink can get very hot during normal
operation. Ensure that the memory modules and heat sink have had sufficient time
to cool before you touch them.
CAUTION: Many repairs may only be done by a certified service technician. You
should only perform troubleshooting and simple repairs as authorized in your
product documentation, or as directed by the online or telephone service and
Coaster_HOM.book Page 78 Monday, November 3, 2014 3:23 PM


