


DES-3226 NWay Standalone Fast Ethernet Switch User’s Guide
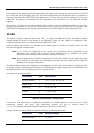
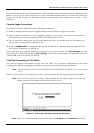
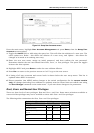
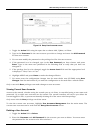
Figure 6-4. Setup User Accounts screen
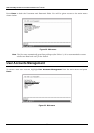
From the main menu, highlight User Accounts Management and press Enter, then the Setup User
Accounts screen appears.
1. Toggle the Action field to Add using the space bar. This will allow the addition of a new user. The
other options are Delete - this allows the deletion of a user entry, and Update - this allows for
changes to be made to an existing user entry.
2. Enter the new user name, assign an initial password, and then confirm the new password.
Determine whether the new user should have Root, User+, or User privileges. The space bar toggles
between the three options.
3. Highlight APPLY and press Enter to make the user addition effective.
4. Press Esc. to return to the previous screen or Ctrl+T to go to the root screen.
5. A listing of all user accounts and access levels is shown below the user setup menu. This list is
updated when APPLY is executed.
6. Please remember that APPLY makes changes to the switch configuration for the current session
only. All changes (including User additions or updates) must be entered into non-volatile ram using
the Save Changes command on the main menu - if you want these changes to be permanent.
Root, User+ and Normal User Privileges
There are three levels of user privileges: Root and User+, and User. Some menu selections available to
users with Root privileges may not be available to those with User+ and User privileges.
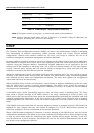
The following table summarizes the Root, User+ and User privileges:
Switch Configuration Privilege
Management Root User+ User
Configuration Yes Read Only Read Only
Network Monitoring Yes Read Only Read Only
Community Strings and Trap
Stations
Yes Read Only Read Only
Update Firmware and Configuration
Files
Yes No No
System Utilities Yes Ping Only Ping Only
40