Alarm and Faults
73
The History Log has the following fields:
• Replay Rate — indicates how long it takes for the replay to play. Use the UP and DOWN buttons
to set the time.
• Status — the status of the Liebert STS2 at the point of the current frame in the replay. The His-
tory log has three statuses: Frozen, Not Frozen and Retrieving Data, please stand by.
• Critical Event — The event which triggered this log to be written. The event is indicated in red on
the bar graph.
• Frame Number — the current frame in the replay. A negative number indicates the replay is at a
point before the triggering event occurred.
11.3 Alarm Notes
The I-PK on Source 1 and I-PK on Source 2 alarms inhibit automatic transfer due to an overload or
load fault. These alarms can be set for either auto or manual alarm reset.
In the auto reset mode, the alarm is reset as soon as the load current and source voltage return to nor-
mal, and transfers are no longer inhibited. In manual mode, the alarm remains active and transfers
are inhibited until the conditions return to normal and the user manually presses the RESET button
(ALRMRST button on LED units). In either case, the cause of the Source 1 or Source 2 I-Peak over-
load should be investigated and resolved (such as by reducing the overload condition or clearing the
output fault) before returning the switch to normal operation.
These events indicate a device failure. The device must be replaced and the system must be restarted
for the fault to clear. A shorted SCR automatically trips open a source input switch (CB1 or CB2) to
prevent transfers in the event of an SCR failure. The SCR failure must be investigated and repaired
before returning the switch to normal operation. Both source input switches must be opened (such as
when the unit is placed in maintenance bypass for servicing) before a shorted or open SCR alarm can
be reset.
11.4 List of Messages
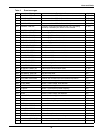
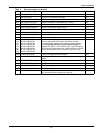
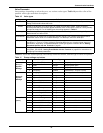
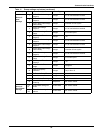
Table 8 lists available event messages, a definition of the event, and the functions that are activated
with the event by default. The functions are indicated as follows:
D — The indicated event initiates the Auto-Dial sequence through a modem.
A — The indicated event activates the Audible alarm.
F — The indicated event triggers a Freeze of the History Log.
L — The indicated event Latches. A latched alarm remains displayed until the alarm condition
has cleared and the RESET (ALRMRST) button has been pressed.
E — By default, all faults and alarms are written to the Event Log. Changing this setting is only
available for the LED units and is set through the RS-232 port. See Setting Event Masks with
the Terminal on page 83
All of these functions, except Freeze, can be reconfigured to trigger for each event, using the Event
Mask option. See 11.1 - Event Mask on page 71. The Freeze function is hard-coded and cannot be
changed for an event.
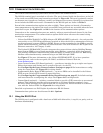
If the front panel of your Liebert STS2 has LEDs and push buttons instead of the touch screen inter-
face, you can view these messages via the RS-232 port. See 12.1.1 - Connecting and Using a
Terminal on page 77 for the commands to view the event messages on a PC terminal.
An LED is used to indicate the presence of any active fault or alarm. Refer to 14.0 - Operating the
Liebert STS2 LED Display for more information about the LEDs.


