


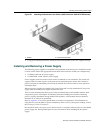

Mounting the Switch
2-4 Installation
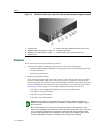
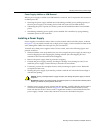
Placing the Switch on a Flat Surface
Wheninstallingtheswitchonaflatsurface,theinstallationoftherubber feetisrecommendedto
preventtheswitchfromsliding.Also,thesurfacemustbeabletosupport15.5kg(35lbs)ofstatic
weight.
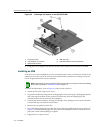
Toinstalltherubberfeet,proceedasfollows:
1. Placetheswitchupsidedownon
asturdyflatsurface.
2. Removethefourrubberfeetfromtheshippingbox.
3. Removetheprotectivestripfromthebackofonerubberfootandpositionitononeofthe
cornersonthebottomoftheswitch.Pressfirmlyintoplace.Repeatthisproceduretoinstall
theremainingrubberfeetin
theothercorners.
4. Afterinstallingtherubberfeet,returntheswitchtoitsuprightposition.
5. Placetheswitchinitsfinallocation.
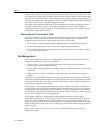
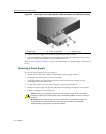
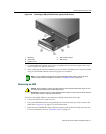
Installing the Switch into a Rack
TheG‐SeriesEthernetswitchcanbemountedinastandardEIA‐310‐Dcompliant48.26‐centimeter
(19‐inch)equipmentrack.Tomounttheswitchintoarack,youmustfirstinstalltherack‐mount
kit,whichconsistsoftwobrackets.Youmustprovidethemountinghardwaretoattachtheswitch
bracketstotherails.
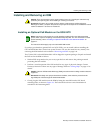
Toinstalltherack‐mountkitandtheninstalltheswitchintotherack:
1. Placetheswitchonasturdyflatsurface.
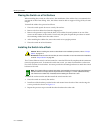
2. Installoneofthebracketsprovidedintherack‐mountkittothesideoftheswitchusingthe
screwsprovidedasshowninFigure 2‐
1.
3. Repeatthepreviousstepstoinstalltheotherbrackettotheotherside.
Caution: Before installing the screws as described in this installation procedure, refer to “Torque
Values” on page A-5.
Precaución: Antes de retirar los tornillos, tal como se describe en las instrucciones de instalación,
consulte “Torque Values” on page A-5.
Note: The G-Series Ethernet switch (with rubber feet installed) will exceed the 2U high Richmond
standard and will not comply with the requirements for mounting in a 19-inch (48.26-centimeter)
rack. Remove the rubber feet, if installed, before installing the switch into a rack.