


www.rletech.com 67 970.484.6510
5 EIA-232 Interface
5.3.2 IP Configuration Menu
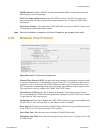
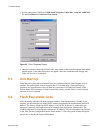
The IP Configuration Menu is accessed by typing a 1at the command prompt in the Main
Configuration Menu. This menu is used to establish IP/TCP and PPP interaction with the
network. The F3400/F1000 must be set up with an IP address, mask, and default router. These
addresses can be obtained from your Network Administrator or IT Department. To enable the
SNMP receiving stations (create communities), the F3400/F1000 MIB, provided on a diskette
with every unit, must be loaded on a system(s) running a Network Operating System (NOS).
This MIB is compiled through standard functions of the NOS. Consult with your Network
Administrator for proper installation of the F3400/F1000 MIB on the NOS. Once the MIB is
loaded, the F3400/F1000 can be discovered and configured over the network. For proper
operation, the IP addresses configured in the F3400/F1000 communities must match the IP
addresses on the receiving stations. Only the administrator's username/password may be
changed from this menu. All other Web users must be changed via the Web interface.
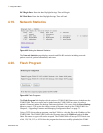
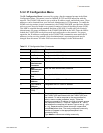
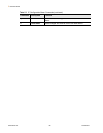
Table 5.3
IP Configuration Menu Commands
Command Description Function
i LAN IP Address Designates the LAN IP address.
m Net Mask Designates the Subnet Mask.
D Default Route Establishes the default IP address.
uWeb
Administrator
Username
Edits the Web administrator username.
pWeb
Administrator
Password
Edits the Web administrator password.
f Web Refresh
Rate
Changes the Web refresh rate.
s PPP Server IP
Address
Designates the PPP server IP address.
c PPP Client IP
Address
Designates the PPP client IP address.
z Max Seg Size
(TCP)
Establishes the maximum segment size.
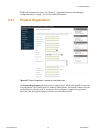
Communities Communities are computers that receive SNMP Traps from
the F3400/F1000 and interact with the F3400/F1000 over
the network. To add a computer to the communities list,
select a menu number posted as “empty.” Enter the
receiving computer's IP address, the type of network access
the machine will have (r – read, w – read/write, n – none),
and whether the computer will receive Traps or not (y – yes,
n – no). Separate each of these items with a space and
press Enter when done. The newly configured community
member will appear in the appropriate space in the
community listing.
Type delete to remove an existing community.