CHAPTER 4: Installing Components
44
3 Record the BIOS settings on your printout, then close the utility.
4 Turn off your server, then follow the instructions in “Preventing static electricity discharge”
on page 18.
5 Follow the instructions in “Opening the server case” on page 19.
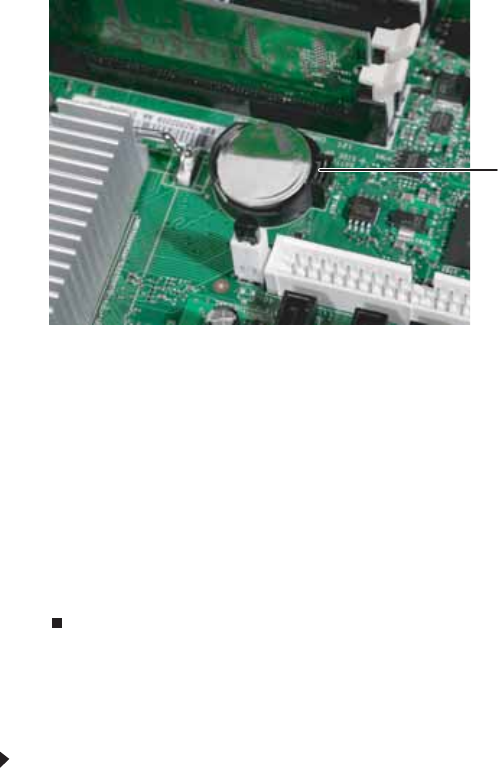
6 Locate the old battery on the system board and note its orientation (see “System board”
on page 5 for the general location of the battery). You will need to install the new battery
the same way.
7 Push the battery retention clip away from the battery until the battery pops up.
8 Remove the old battery.
9 Make sure that the positive (+) side of the new battery is facing correctly, then press the
new battery into the socket until it snaps into place.
10 Follow the instructions in “Closing the server case” on page 24.
11 Turn on the server.
12 Press F2 when the Gateway logo screen appears during startup. The BIOS Setup utility
opens.
13 Restore any BIOS settings that you wrote down in Step 3.
14 Save all your settings and close the BIOS Setup utility.
Replacing the system board
To replace the system board:
1 Follow the instructions in “Preventing static electricity discharge” on page 18.
2 Follow the instructions in “Opening the server case” on page 19.
3 Remove the processor air duct by following the instructions in “Removing the processor
air duct” on page 21.
4 Remove the memory modules by following the instructions in “Installing memory” on
page 34.
5 Remove all of the expansion cards by following the instructions in “Installing PCI expansion
cards” on page 35.
6 Remove the heat sink and processor by following the instructions in “Replacing the
processor” on page 38.
7 Disconnect the power and data cables from the system board, noting their locations and
orientation. (You will reconnect the cables after you install the new board.)
Battery retention clip


