


CHAPTER 2: System utilities
38
BIOS recovery
An interruption during a BIOS flash procedure (e.g. a power outage) can corrupt
the BIOS code, which will cause the system to go into an unbootable state. You
need to access and execute the boot block program to reboot the computer and
recover the regular BIOS code.
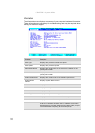
Creating the Crisis Recovery disk
To create the Crisis Recovery disk:
1 Prepare a removable USB storage device with a capacity size greater than
10 MB.
Note that all data on the USB storage device will be cleared during the
creation of the crisis disk.
2 Set up a computer running the Windows XP or Windows Vista OS and plug
in the USB storage device into an available USB port.
3 Decompress the Crisis Package Source.
4 Select WINCRIS.exe and then select Run as administrator.
5 Keep the default settings and then click Start button.
6 When the pop-up warning dialog box appears, click OK to create the crisis
disk.
7 Click No if you do not want to create another crisis disk.
8 Eject and reconnect the USB removable storage device, and make sure it
contains the
BIOS.wph, MINIDOS.sys, and PHLASH16.exe files.
Performing a BIOS recovery
To perform a BIOS recovery:
1 Shut down the BIOS failed-computer.
2 Connect the USB storage device containing the Crisis Recovery disk files
to the failed computer.
3 Press and hold the Fn+Esc keys (this is the BIOS recovery hotkey), then
press the power button.
The BIOS recovery process begins. When the process is complete the
computer will automatically reboot.
4 Disconnect the USB storage device from the computer.
5 Perform a BIOS flash procedure to update the BIOS firmware.
Caution
Observe the following when performing a BIOS recovery:
• Make sure the battery pack is installed to the system and that
the computer is connected to a UPS unit during the BIOS
recovery and BIOS flash procedures.
• The BIOS crisis recovery disk should be prepared in a computer
running the Windows XP or Windows Vista OS.