


10 CIMPLICITY® Display Station Touch Display: IC752CTD400/450
–
March 1998 GFK-1425B
Installing the Floppy Disk Drive
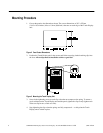
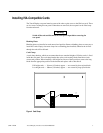
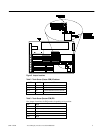
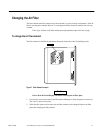
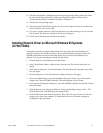
The floppy disk drive is designed for mounting on the rear panel of the Touch Display unit. Two
locating slots in the rear panel accept the two metal brackets on the disk drive housing. A
thumbscrew fastens the drive assembly to the rear panel. A ribbon cable, terminated with a D-type
connector, extends from the disk drive to the floppy disk connector at the side of the unit.
Figure 6. Floppy Disk Drive Mounting
Caution
The Touch Display unit must be powered off before the disk drive connector
is connected or disconnected. Failure to observe this precaution will result in
damage to the equipment.
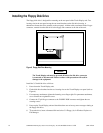
Install the 3.5 inch disk drive as follows:
1
.
Power down the Touch Display unit.
2
.
Fit the disk drive brackets into the two locating slots on the Touch Display rear panel (refer to
Figure 6).
3
.
For temporary attachment, tighten the fastening screw finger tight. For permanent attachment,
use a screwdriver to tighten the screw.
4
.
Connect the 37-pin D-type connector to the FLOPPY DISK connector and tighten the two
securing screws.
5
.
Power up the Touch Display unit and check that there are no boot up error messages relating to
the floppy disk drive.
6
. To
test the drive, insert a formatted disk and select 3 ½ Floppy (A): in Windows Explorer or
File Manager.