


SHIFT
Input/Output
Test
SHIFT
Service
Configuration
8Ć23 Removal and ReplacementC3187Ć90000
Input/Output Test
1 Connect a loopback connector (part number 07440Ć60302) to the serial port of the plotter.
If a connector is not available, you can place a jumper between pins 2 and 3 of the
serial port for the test.
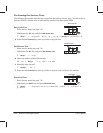
2 Enter service mode (see page 7Ć2).
3 Hold down the
SHIFT key and press Input/Output Test.
An error is displayed on the front panel if the test fails.
MediaĆSensor Test
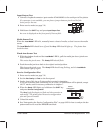
When the
Load Media LED is lit, manually insert a sheet of media, so that it covers the media
sensor.
The Load Media LED should turn off, and the
Busy
LED should light up. The plotter then
loads the sheet.
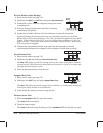
PinchĆArmĆSensor Test
1 With the window closed and the
Load Media LED lit, pull the mediaĆjam lever (pinchĆarm
lever) forward.
This raises the pinch arms. The
Ready
LED should flash.
2 Push the mediaĆjam lever back to its original vertical position.
This lowers the pinch arms. The
Ready
LED should stop flashing, and the
Load Media
LED should light up again.
Service Configuration Plot
1 Enter service mode (see page 7Ć2).
2 Set the
Plot Quality to Final on the front panel.
3 Load a sheet of A1Ćsize or DĆsize media in portrait orientation.
If you use a smaller sheet (minimum A4 or A size), all information will be plotted, except
theX" marks, used for accuracy calibration in chapter 7.
4 When the
Ready LED lights up, hold down the SHIFT key
and press
Service Configuration.
The
Busy
light first begins to flash and then remains on
and steady. The plotter plots the service configuration
plot and ejects the media.
5 Unload the media.
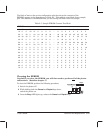
6 See Interpreting the Service Configuration Plot" on page 8Ć25 for how to analyze the bar
pattern and how to read the EEROM text block.