


30 HP StorageWorks 2012i Modular Smart Array user guide • March 2008
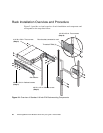
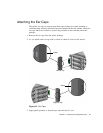
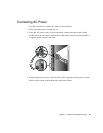
Figure 2-2 Side Bracket With Alignment Marks
b. On one side, insert the first two screws through the side bracket slots above and
below the alignment mark into the rear-most threaded holes in the enclosure.
For example, to mount the enclosure in a 28-inch deep rack, position the side
bracket so that the 28-inch alignment mark is aligned with the rear-most threaded
holes in the enclosure.
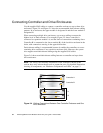
c. Insert up to six more screws through the side bracket slots into the other threaded
holes in the side of the enclosure.
d. Repeat Step b and Step c to attach the other side bracket to the enclosure.
6. Attach the rear brackets to the rear vertical posts of the rack using #10-32 x 5/8-inch
screws (two per bracket).
7. Lift the enclosure and slide the side brackets into the rear brackets, which are
attached to the rear posts.
Adjust the depth of the side brackets so that the slots nearest the ends of the side
brackets align with the four PEM nuts in the rear brackets.
8. Attach each side bracket to a rear bracket using #8-32 x 1/4-inch screws (four per
bracket).
9. Make sure that the enclosure is level and then secure the mounting ears on the front
of the enclosure to the rack face using #10-32 x 5/8-inch screws (two per ear).
10. Tighten the screws in the side brackets.
11. If you removed modules from the enclosure, reinsert them.
12. If you attached the optional front support nylon brackets to the rack face, remove
those brackets.
Note – When you finish installing an enclosure, you may have unused screws left
in your rack kit; extra screws are provided in case any are misplaced.