


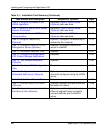

edge switch 2/32 installation guide 2-5
Installing and Configuring the Edge Switch 2/32
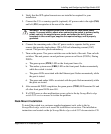
4. Verify that the SFP optical transceivers are installed as required for your
installation.
5. Connect the U.S. or country-specific (optional) AC power cords to the right (PS0)
and left (PS1) receptacles at the rear of the chassis.
WARNING: An HP-supplied power cord is provided for each switch power
supply. To prevent electric shock when connecting the switch to primary facility
power, use only the supplied power cords, and ensure the facility power
receptacle is the correct type, supplies the required voltage, and is properly
grounded.
6. Connect the remaining ends of the AC power cords to separate facility power
sources that provide single-phase, 120 to 240 volt alternating current (VAC)
current. This provides power redundancy.
7. Turn on the power. Two power switches are on the back of the unit. Turn on both
switches. The unit powers on and performs power-on self-tests (POSTs). During
POSTs:
a. The green power (PWR) LED on the front panel turns On.
b. The amber system error (ERR) LED on the front panel flashes momentarily
while the switch is tested.
c. The green LEDs associated with the Ethernet port flashes momentarily while
the port is tested.
d. The green and amber LEDs associated with the ports flash momentarily while
the ports are tested.
8. After successful POST completion, the green power (PWR) LED remains O
N and
all other front panel LEDs turn O
FF.
9. If a POST error or other malfunction occurs, refer to the hp StorageWorks edge
switch 2/32 service manual to isolate the problem.
Rack-Mount Installation
To install the switch in a customer-supplied equipment rack, refer to the hp
StorageWorks edge switch rack mount kit installation instructions. The installation
instructions are located on the hp StorageWorks edge switch 2/32 documentation CD.