


USER GUIDE FOR HP 6 COLOR PLUGIN
AG50324 Rev. 7 24
10.4 Troubleshooting post processing command
Your post processing commands might not execute as you would expect them to. If this is the case, there are a
number of troubleshooting tips which you can follow:
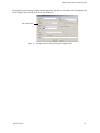
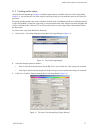
• Open a command dialog and run the post processing command there.
• A substitution code may be being misinterpreted by your operating system. Try enclosing the substi-
tution code in double quotes, for example
"%f".
• The total length of the expanded command line may be too long for your operating system to handle.
Expanded means after the full text has been inserted for the substitution codes. All systems will sup-
port command lines up to125 characters: many support command lines considerably longer.
• For a thorough test of how commands behave when used at the command prompt, try running a batch
file with the following content:
echo %1 %2 %3 %4 %5 %6 %7 %9
pause
11 Color management
The HP Designjet plugin provides ProofReady profiles for ‘out-of-the-box’ color management. The profiles
adjust color output to suit the resolution and paper type installed in the printer, ensuring that output is color accu-
rate for whatever media settings are in use.
For more information on the Harlequin RIP color management solutions, see the Harlequin ColorPro
™
User’s
Guide and Chapter 13 of the RIPMate User Guide, “Calibration”.
This section briefly describes the complete color management process, including:
• “Calibrating the printer” on page 24.
• “Creating and installing ICC profiles” on page 25.
• “Creating color setups” on page 27.
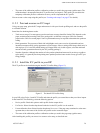
11.1 Calibrating the printer
The plugin is supplied with a number of reference calibration profiles which define the output profile of an ideal,
or ‘reference’, HP DesignJet printer. In your page setups, when you select a ProofReady profile the correct cal-
ibration profile is automatically chosen by the plugin. However, for maximum output quality, we recommend
that you produce calibration profiles for your own printer, and select these in the Calibration drop-down list in
your page setups.
The reference calibration profile supplied with the plugin are easy to identify, since they are labelled with paren-
theses; for example,
(Premium Photo 1200). The actual calibration profile files can be found in the following
folder:
…\<RIP_folder>\SW\Config\Devices\DevCalibration\
The steps for creating a calibration profile vary depending on the version of RIP you are running. See See Chap-
ter 13 “Calibration” of the RIPMate User Guide for information on creating a calibration profile.