


Alea Systems, Inc. Rev.1.13 Pingo-Photo Rep
User manual
10
Automatic installation: In the Drivers/PC driver directory of the distribution CD, double click on
"install_cda_lpt1.bat". This will install the CD Printer to the LPT1 parallel port.
This procedure install the CD Printer driver for Windows NT using parallel connection:
All OS - 1284(Parallel) connection
Note: This installation method does not support printer status
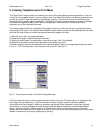
• Click Start - Settings - Printers - open Add Printer
• `Add New HW Wizard' window appears
• Configuration (typically My Computer), Click Next
• Port (typically LPT1), Click Next
• Model - Have Disk...
• Browse... (cdrom folder) - enu\drivers\win9x_me\hpfCDAx.inf (Win 95, 98, ME)
enu\drivers\win_nt\hpfCDAn.inf (Windows NT4)
enu\drivers\win_2k\hpfCDAk.inf (Windows 2K)
• Select the Pingo Phot model from the drivers listed
All OS automatic installation:
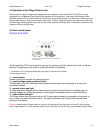
5.4 Installing the Printer Driver Software (Mac - USB)
Copy the compressed file, PingoPhoto.set, from the Mac folder located on the PowerPrinter CD-ROM to your
local hard drive. Double click on the file to start the decompression. The application, Pingo Photo 4.31 Installer,
will now appear. Double click on it to start the installation. Follow the instructions shown to complete the
installation. Once installed, go to the chooser to select the printer for printing. You are now ready to begin
printing.
5.5 Graphics Applications
A graphics application will be required to use the Pingo Photo printer. Any computer software application can be
used to print on a CD. Applications which allow position control (such as graphics applications, e.g. Adobe
Illustrator, Corel Draw, Surething, etc.) will be the easiest to use. If you do not have a graphics application,
included is a 30 day trial version of SureThing software (for PC users only) and the Diskus software (for PC
users only) which is located on the Compact Disc labeled Pingo Photo.
The Pingo Photo printer comes with templates for use with several graphics applications. They consist of
background guides, and where possible, a top-layer mask to block out everything except for the printable surface
of the CD-R. We assume that if you choose to use one of the template files provided that: 1) you are a registered
user of the graphic application for which the template applies; and 2) you have a working knowledge of the
application. The template files are located on the Compact Disc labeled Pingo Photo.
Included templates: Adobe Illustrator, Adobe PhotoShop, CorelDraw and Canvas.
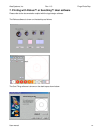
5.5 Using the Alea Systems Template Files
To use the template files provided, simply copy them from Compact Disc labeled Pingo photo to the place on
your hard drive where documents are stored (for example a directory entitled "My Documents".) Follow the
directions on the "Readme" file that came with the templates. To make your own template, refer to section 5.
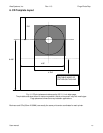
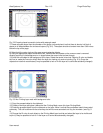
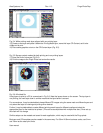
You may have to adjust your template's placement to fit your printer's specific printing characteristics. This
entails moving the background guides, and in some cases the "mask layer" as well. See Fig 4.1 for approximate
printable area that must be defined in all applications used with the Pingo Photo.