


Alea Systems, Inc. Rev.1.13 Pingo-Photo Rep
User manual
9
cleaned (simply wipe the ink off with a moist towel) before the CD is re-introduced into the printer. Failure to
follow this procedure may result in damage to the CD-Rs.
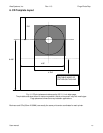
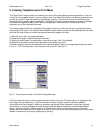
The dimensions of the printable area on different media varies significantly from brand to brand. For accurate
print placement, templates and masks must be adjusted for each type of media used. Fig. 4-1 depicts the basic
placement and printable area that can be used as a starting point to develop a new print mask. Check the
specific media dimensions against those above to modify or create application masks. See Section 5 for
additional information on creating a print mask.
4.2 Manufacturing and Testing the Printer
To ensure proper coordinated functioning of the significant electronic and mechanical modifications and
additions made to the HP printer engine, the printer has been loaded with ink cartridges and actual print tests
have been made before packing for shipment. You will notice ink remnants from this print-testing, but the printer
has never been used other than for performing these necessary quality assurance tests
4.3 Ink Cartridge Life
Ink cartridge life is a direct function of the print content. The HP DeskJet Printer uses a color cartridge and a
black cartridge. The cartridges can be replaced independently to reduce cost. Although the actual quantities of
CDs produced will vary widely based on image content and color requirements, for CDs with nominal ink
coverage for text and a logo, the cartridges may last up to 500 discs. Full bleed printing where the ink covers
100% of the disc surface may yield as little as 50 CDs from a color cartridge.
The printer will monitor ink usage and provide low-ink warnings and stop the printer when it senses it is out of
ink. This is a reasonably good indicator and should be followed.
5. Getting Started
Before actual CD printing can begin, there are several steps to be completed:
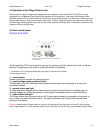
5.1 Connecting the Pingo Photo for WINDOWS
Connecting the Pingo Photo to a desktop computer is no different than connecting any other printer. The Pingo
Photo is based on the HP DeskJet 9xx ink jet printer and comes with a standard parallel printer cable (USB
cable is optional). Please note that the parallel cable is not a SCSI interface cable!
SPECIAL NOTE: It is highly recommended to use the parallel cable connection as the primary connection for the
Pingo Photo printer. This will eliminate the possibilities of communication errors between the printer and PC.
With power to both the Pingo Photo and computer turned OFF, connect the parallel cable or USB cable to the
computer and then to the printer. Plug in power cord.
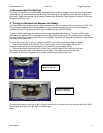
5.2 Installing the Ink Cartridges
Turn the printer power on using the printer's power switch. Remove the vinyl tape from both ink cartridges. Open
the top cover and insert ink cartridges. Close cradle latch, then close top cover. DO NOT TOUCH OR REMOVE
COPPER STRIP ON PRINT CARTRIDGES.
5.3 Installing the Printer Driver Software (WINDOWS-Parallel)
The print driver is located on the Compact Disc labeled Pingo Photo found in the accessory kit.
DO NOT run virus protection or other software programs when installing your printer software. Turn on your
computer and wait for Windows to start.