


HP OmniBook 4100/4150 Removal and Replacement 2-17
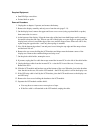
Removal Procedure
1. Unplug the ac adapter, if present, and remove the battery.
2. Remove these additional assemblies:
• Floppy module or other module (page 2-3).
• Hard disk drive (page 2-5).
• Keyboard (page 2-9).
• Display assembly and strip cover (page 2-11).
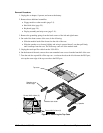
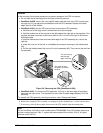
3. Remove the grounding springs from the back corners of the left and right frames.
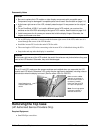
4. On each of the front corners of the case, do the following:
• Slide the module latch slider forward on the side of the case.
• Slide the speaker cover forward slightly and swing it outward about 2 cm, then pull firmly
until it unsnaps from the case. The slider may come off of the module latch.
5. Unplug the touch-pad flex cable from the VGA PCA.
6. On the bottom of the unit, remove the seven unmarked case screws from the front half of the case.
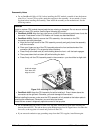
7. Turn the unit face up and lift off the top case—to release the tab at the left side near the PS/2 port,
twist up the outer edge of the top case above the PS/2 port.
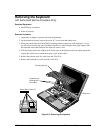
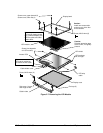
Figure 2-8. Removing the Top Case
Speaker cover,
left and right
Top case
Module latch slider
Speaker
Screw, M2.5×19mm (5)
Screw, M2.5×16mm (2)