


2-20 Removal and Replacement HP OmniBook 4100/4150
Removal Procedure
1. Unplug the ac adapter, if present, and remove the battery.
2. Remove these additional assemblies:
• Floppy module or other module (page 2-3).
• Hard disk drive (page 2-5).
• Keyboard (page 2-9).
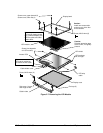
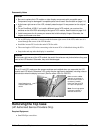
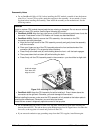
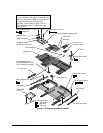
3. For an OmniBook that has a 2-screw CPU top plate, remove the screw from the heatsink cover
and lift it off the heatpipe. (The figure on page 2-26 shows these and other parts.)
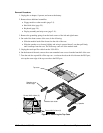
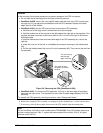
4. Remove the screws holding the CPU top plate (see the picture on page 4-8 for details):
• For an OmniBook 4150B, remove the five screws from the heatsink/top plate assembly—one
at the front-right corner (M2×12mm), two at the left side (M2 with spring), and two at the
diagonal corners of processor (M2×3.5mm).
• For an OmniBook 4150† with a 5-screw CPU top plate, remove the five screws—one at the
heatsink (M2×5mm), two at the corners of the CPU housing (M2×14mm), and two at
diagonal corners of the CPU module below (M2×3.5mm). (Do not remove the two small
screws above the middle of the CPU.)
• For an OmniBook with a 2-screw CPU top plate, remove the two screws at the corners
(M2×14mm).
5. For an OmniBook 4150B, lift off the heatsink/top plate.
For an OmniBook 4150† with a 5-screw CPU top plate, lift off the top plate, carefully detaching
the heatpipe end tab from the slot in the fan cover.