


Electronic Forms User Guide
Printing Forms
Selecting Print Options
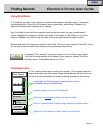
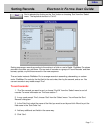
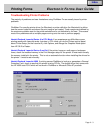
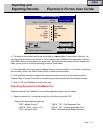
In FileMaker Pro, you can print specific pages, control the print quality, print to a file, add page
numbers, choose to print specific records, print field and script definitions, print a specific number of
copies, and collate pages. To select print options, choose ‘Print’ from the ‘File’ menu and select an
option or click on the “Print’ button.
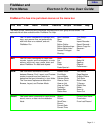
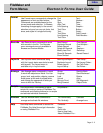
- To print all pages in a form, click ‘All’.
- To print a range of pages, click ‘Pages’ and type the first page in the ‘From’ box and the last page
in the To box.
- If your printer offers different print qualities, click ‘Print Quality’ and select a print quality option
such as a dpi value (dots per inch) or High, Medium, Low, or Draft.
- To store print jobs to print later or to print from a different computer, check ‘Print to File’.
- If a form uses the page number symbols ( # # ) in a layout, you can change the starting page
number that prints at the bottom of each page by typing a number in the ‘Number Pages From’ box.
- To print all records in the ‘Found Set’, click ‘Records Being Browsed’.
- To print the current record only, click ‘Current Record’.
- To print a blank record, click ‘Blank Record’ and select one of the following options from the
pop-up list;
As Formatted to print fields as formatted in the Field Borders dialog box.
With Boxes to print each field shown by a box.
With Underlines to print each field with an underline.
To print a list of field definitions, click Field Definitions.
- To print a script definition, click ‘Script Definition For’ and select ‘All Scripts’ or a specific script
from the pop-up list.
- To set the number of copies you want to print, type a number in the ‘Copies’ box.
- To print complete, collated copies instead of all copies of a page before going on to the next, click
‘Collate’ copies. Once you've selected your print options, click ‘OK’ to begin printing.
Page 9 - 2
Index