


Electronic Forms User Guide
Importing and
Exporting Records
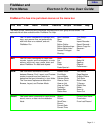
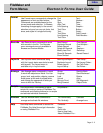
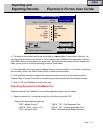
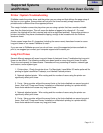
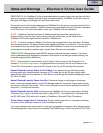
4. The fields in the source file will map to the fields in the destination file as shown in the list. You
can drag the field names in the ‘Fields In’ list to change where FileMaker Pro maps data. Click the
‘Scan Data’ buttons to view data in the source file. By clicking the connection arrows between the
fields, you can turn on or off the importing of data for those fields.
6. Click ‘Add New Records’ to append the imported records to the end of the destination file or
‘Replace Data in Current Found Set’ to overwrite any existing records with the imported records.
5. If the Destination file is a revised or updated version of the source file, or if the fields in both files
are the same, click on the ‘Match Fields’ button to match the field entries.
7. Click on ‘OK’ and FileMaker Pro will do the rest.
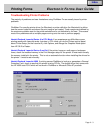
Exporting Records from FileMaker Pro
Exporting records from FileMaker Pro to another application type is just as simple.
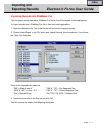
1. Open the source file - Locate the source file in the files list and click ‘OK’.
*.DBF = dBase III and IV
*.WKS & *.WK1 = Lotus 1.2.3.
*.SLK = Microsoft Excel
*.TAB & *.TXT = Tab-Separated Text
*.CSV & *.TXT = Comma-Separated Text
*.MER = Microsoft Word Merge Document
Some of the exportable file types are:
CancelImport
Define Fields...
Contractor
Street Address
City
State
Zip Code
Date
Contractor
Street Address
City
State
Zip Code
Date
Field Names
Add new records
Replace data in current found set
Data in “134_146.FP3” Fields in “134_146 Copy.FP3”
Import Field Mapping
View By:
Matching Names
<< >>
Scan
Data
Page 11 - 2
Index