


3 Setting Up a Factory-Integrated Storage System
This chapter describes the procedures for setting up a storage system that is delivered in a
factory-integrated HP cabinet with all of the components installed. Before you set up a storage
system, ensure all requirements documented in the HP 3PAR StoreServ 7000 Storage Site Planning
Manual have been met.
WARNING! Do not use this procedure if you are installing storage system components into an
existing or partially populated rack. To install storage system components into an existing rack,
see “Installing Storage System Components into a Rack” (page 19).
Unpacking the Cabinet
When unpacking the rack, refer to the unpacking diagrams on the outside of the cardboard
shipping container.
CAUTION: To avoid tipping the cabinet, one person must guide the cabinet down the ramp, with
the other person pushing from behind.
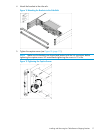
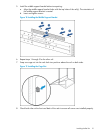
To unpack the rack:
1. Locate the front of the shipping container and unlatch the four rotary latches securing the front
panel. To unlatch the rotary latches, raise the levers and turn them counterclockwise one
half-turn.
2. Lower the front panel of the shipping container to form a ramp.
3. Remove the packing foam from the front of the storage system.
4. Remove the rack from the container.
5. Carefully guide the rack down the ramp.
6. Remove the plastic packing materials and place them into the shipping container for reuse.
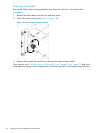
Positioning the Cabinet
CAUTION: To prevent potential damage to system equipment, do not adjust the position of the
cabinet when the power is on.
Position the cabinet in the operating location. If the operating location has raised floor tiles with
cutouts to facilitate cable routing, position the cabinet over the cutouts in the tiles. See the HP 3PAR
StoreServ 7000 Storage Site Planning Manual for more information on the structural considerations
for using raised flooring.
After positioning the storage system, use the four leveling feet to stabilize the cabinet and prevent
movement during operation:
1. Using an adjustable wrench, turn each leveling foot clockwise until the weight of the rack rests
on the leveling feet instead of the casters.
2. Using the wrench, lock the leveling feet in place by turning the locking nut on each foot
counterclockwise until tight.
3. Verify the rack is stationary.
For more information on final positioning, see “Repositioning the Storage System” (page 37).
Verify the Cabling
The cabling for a factory-integrated storage system is complete. You must plug in the power cords
and install the host and Ethernet cables.
Unpacking the Cabinet 15