


Use the following guidelines to determine the correct configuration for
your CD-RW drive.
Configure the CD-ReWritable drive as a Master if it will be the
only device connected to an IDE cable. (This is the preset
configuration.)
Configure the CD-ReWritable drive as a Slave if it will be the
second device on an IDE cable. Be sure to configure the other
device as a Master. In some cases, a hard disk drive might
require a Master with Slave Present jumper setting when another
device on the same cable is configured as a Slave. For further
information on setting configuration jumpers on other devices,
refer to the documentation that comes with your computer system
or with the device.
Some non-IBM computers use special ATA cables with two wires
reversed in the device connectors so that the drives can be
configured by the cable instead of by jumper position. Use the
Cable Select position only for systems equipped with these
special cables. See the documentation that came with your
computer to determine if your ATA adapter requires that you
place the jumpers in the Cable Select position.
If you place the jumpers in the Cable Select position, the IDE
cable automatically assigns the Master and Slave settings based
on the position of the drive on the cable. You must use the
Cable Select setting for this cabling system whether the
CD-ReWritable drive is the only device or the second device
connected to the cable. The drive closest to the IDE controller is
automatically the Master drive. Any other devices on the IDE
cable must also be set to Cable Select.
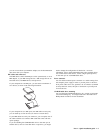
Step 4. Mounting the drive in the bay
Attention: Be sure to use the M3 x 5 mm mounting screws that
come with the option package. You might damage the drive if
you use mounting screws that are too long.
You can mount the CD-ReWritable drive horizontally or vertically in
the computer. If you mount the drive vertically, you must secure any
CDs you place into the drive before closing the drive tray, or the drive
will not be able to read from the CD properly. For further instructions
on securing your CDs in a vertically mounted drive, go to page 2-5.
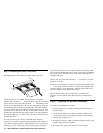
1. Slide the drive into the bay. Your computer might require unique
installation procedures for storage devices. Refer to the
documentation that comes with your computer for further
instructions on installing storage devices.
2. Align the drive-bay screw holes with the threaded holes in the
drive housing or mounting bracket.
3. Loosely hand thread the screws in the screw holes to check the
alignment of the screws with the screw holes. Usually two
screws are used on each side. If the screws are correctly aligned
with the screw holes, tighten them to secure the drive. Do not
overtighten.
Part 1: Quick installation guide 1-5