


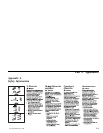
If you are using Windows 98, Windows 95 or Windows NT 4.0, go to
“Using the audio-CD program for Windows 98, Windows 95, or
Windows NT 4.0” for information on using the audio-CD program.
If you are using Windows 3.x, go to “Using the audio-CD program for
Windows 3.x” for information on using the audio-CD program.
If you are using OS/2, go to “Using the audio-CD program for OS/2”
on page 2-8 for information on using the audio-CD program.
If you are using DOS, go to “Using the audio-CD program for DOS”
on page 2-8 for information on using the audio-CD program.
Using the audio-CD program for Windows 98,
Windows 95, or Windows NT 4.0
To use the audio utility for Windows 98, Windows 95, or Windows
NT 4.0:
1. Turn on the computer.
2. Load an audio CD into the CD tray.
3. Click Start.
4. Move the cursor up to Programs, then to Accessories, then to
Multimedia, then to Media Player.
5. When the Media Player window opens, double-click Media
Player.
6. Double-click Device.
7. Double-click CD Audio.
If you do not see the Media Player or CD Audio icons in the Media
Player folder, you must install the Windows CD Audio device driver
as follows:
1. Double-click the My Computer, then double-click Control
Panel, then double-click Multimedia.
2. Click Advanced.
3. Double-click Media Control Devices.
4. Click CD Audio Devices.
5. Make sure that the CD device driver is enabled. If the driver is
not present or is disabled, install the driver.
Using the audio-CD program for Windows 3.x
To use the Windows 3.x audio utility:
1. Turn on the computer.
2. Load an audio CD into the CD tray.
3. Double-click Accessories.
4. Double-click Media Player; then double-click Device.
5. Click CD Audio.
If you do not see the Media Player icon or the CD Audio icon in the
Media Player folder, you must install the Windows CD Audio device
driver as follows:
1. From the Program Manager, select the Main folder.
2. Click Control Panel; then click Drivers.
3. Click MCI CD Audio if it is not already installed.
4. Follow the on-screen instructions.
Part 2: User’s guide 2-7