


¦ +-----------------------------------------------------------------------+ ¦
¦ ¦CONFIG SSA Configurator and Service Aids Vyymmdd XX Version¦ ¦
¦ +-----------------------------------------------------------------------+ ¦
¦ +----------------------------+ ¦
¦ ¦ Main M+------------------------------------------+ ¦
¦ +--------------¦ Bus X +----------------------------+ (Q) ¦ ¦
¦ ¦ +-------¦ Members for RAID-X Arrays ¦-----¦ ¦
¦ ¦ New Disks ¦ RAI+--+----------------------------¦---+ ¦ ¦
¦ ¦ Free Resour¦ RAI¦ ¦ ¦ ¦+¦ ¦
¦ ¦ Syst+------¦ RAI+--¦1. xxxxxxxx status ¦---¦¦¦ ¦
¦ ¦ SSA ¦ ¦ Rej¦ S¦ ¦ ¦¦¦ ¦
¦ ¦ Even+------¦ Non¦ a¦ ¦ ¦¦¦ ¦
¦ ¦ Serv¦ Bus X¦ Hot¦ a¦ ¦ ¦¦¦ ¦
¦ ¦ Abou¦ Bus X¦ Run¦ ¦ ¦ ¦¦¦ ¦
¦ ¦ ¦ ¦ Run¦ ¦ ¦ ¦+¦ ¦
¦ ¦ +------¦ Vie¦ +----------------------------+ ¦ ¦ ¦
¦ ¦ ¦ Dis+-----------------------------------+ ¦ ¦
¦ ¦ +------------------------------------------+ ¦
¦ +----------------------------+ ¦
¦ +----------------------------------------------------------------+ ¦
¦ ¦<ESCAPE> Exit <INSERT> Insert <DELETE> Delete <F1> Help ¦ ¦
¦ ¦<F9> FlashOn <F10> FlashOff ¦ ¦
¦ +----------------------------------------------------------------+ ¦
¦ ¦
¦ ¦
+----------------------------------------------------------------------------------+
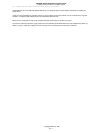
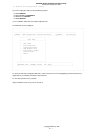
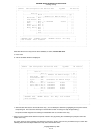
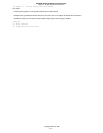
Select disk drives for the array from the list of candidates; to do this, for each disk drive:
a. Press Insert
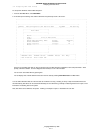
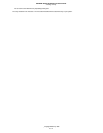
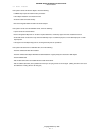
b. A list of candidate disk drives is displayed:
+----------------------------------------------------------------------------------+
¦ ¦
¦ ¦
¦ +-----------------------------------------------------------------------+ ¦
¦ ¦CONFIG SSA Configurator and Service Aids Vyymmdd XX Version¦ ¦
¦ +-----------------------------------------------------------------------+ ¦
¦ +----------------------------+ ¦
¦ ¦ Main M+------------------------------------------+ ¦
¦ +--------------¦ Bus X +----------------------------+ (Q) ¦ ¦
¦ ¦ +-------¦ Members for RAID-X Arrays ¦-----¦ ¦
¦ ¦ New Disks ¦ RAI+--+----------------------------¦---+ ¦ ¦
¦ ¦ Free Resour¦ RA+-----------------------------------+¦+¦ ¦
¦ ¦ Syst+------¦ RA¦ Candidates for RAID-X Arrays ¦¦¦¦ ¦
¦ ¦ SSA ¦ ¦ Re+-----------------------------------¦¦¦¦ ¦
¦ ¦ Even+------¦ No¦1. canUID111 status ¦¦¦¦ ¦
¦ ¦ Serv¦ Bus X¦ Ho¦2. canUID222 status ¦¦¦¦ ¦
¦ ¦ Abou¦ Bus X¦ Ru¦3. canUID333 status ¦¦¦¦ ¦
¦ ¦ ¦ ¦ Ru¦4. canUID444 status ¦¦+¦ ¦
¦ ¦ +------¦ Vi¦5. canUID555 status ¦¦ ¦ ¦
¦ ¦ ¦ Di¦ ¦+ ¦ ¦
¦ ¦ +---+-----------------------------------+--+ ¦
¦ +----------------------------+ ¦
¦ +----------------------------------------------------------------+ ¦
¦ ¦<ESCAPE> Exit <ENTER> Select <F1> Help <F9> FlashOn ¦ ¦
¦ ¦<F10> FlashOff ¦ ¦
¦ +----------------------------------------------------------------+ ¦
¦ ¦
¦ ¦
+----------------------------------------------------------------------------------+
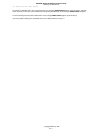
c. Select the disk drive that is to be included in the array. (You can identify the disk drive by highlighting its Unique ID in this list
and pressing F9. This causes the Check light on the disk drive to flash. Pressing F10 stops the light flashing.)
The previous window reappears now showing the selected disk drive as a member of the array.
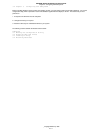
7. When you have selected all the disk drives required, create the array by pressing Esc and following the prompt to confirm the
creation of the array.
The screen shown in step 4 reappears now showing the new array in the list. If the new array is a RAID-5 array, it is shown with
rebuilding
status while the adapter initializes the array and its member disk drives.
SSA RAID Adapter Installation and User's Guide.
Creating an Array
_ Copyright IBM Corp. 1996
3.3 - 3