


4.3 Changing Failed Disk Drives
If you have one of the SRNs in the list above, you can change the disk drive using the following procedure:
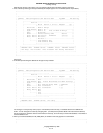
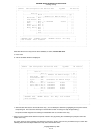
1. From the Main Menu, select SSA Adapter List, select the adapter, and then select Disk Service Aids.
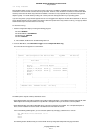
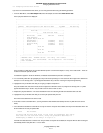
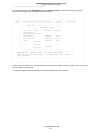
A list of physical disk drives is displayed:
+----------------------------------------------------------------------------------+
¦ ¦
¦ ¦
¦ +-----------------------------------------------------------------------+ ¦
¦ ¦CONFIG SSA Configurator and Service Aids Vyymmdd XX Version¦ ¦
¦ +-----------------------------------------------------------------------+ ¦
¦ +----------------------------+ ¦
¦ ¦ Main Me+------------------------------+ ¦
¦ +---------------¦ Disk Service Aids ¦ ¦
¦ ¦ +------------------------------¦ ¦
¦ ¦ New Disks ¦Link SSA UID Status¦ ¦
¦ ¦ Free Resourc¦ ¦ ¦
¦ ¦ System Resou¦Port A1 ¦ ¦
¦ ¦ SSA Adapter ¦ uidxxxxx Good ¦ ¦
¦ ¦ Event/Error ¦ uidxxxxy Good ¦ ¦
¦ ¦ Service Aids¦ uidxxxyy Good ¦ ¦
¦ ¦ About ¦ uidxxzzz Good ¦ ¦
¦ ¦ ¦Port A2 ¦ ¦
¦ ¦ ¦ ¦ ¦
¦ ¦ ¦Port B1 ¦ ¦
¦ ¦ ¦ No Disks ¦ ¦
¦ ¦ ¦Port B2 ¦ ¦
¦ +---------------+------------------------------+ ¦
¦ +----------------------------------------------------------------+ ¦
¦ ¦<ESCAPE> Exit <ENTER> Select <F1> Help <F2> Format ¦ ¦
¦ ¦<F3> Certify <F4> ServiceMode <F5> Diagnostics <F9> FlashOn ¦ ¦
¦ ¦<F10> FlashOff ¦ ¦
¦ +----------------------------------------------------------------+ ¦
¦ ¦
¦ ¦
+----------------------------------------------------------------------------------+
In this example, four disk drives are connected between ports A1 and A2 of the adapter, in a loop, in the order shown. There are
no disks connected to ports B1 and B2.
If a dotted line appears in the list of disk drives, it indicates that the SSA loop is broken at that place.
2. You can identify a disk drive by highlighting its entry in this list and pressing F9. This causes the Check light on the disk drive to
flash (if it is not on already) and a > symbol appears beside the entry in the list. Pressing F10 stops the light flashing.
3. Highlight the entry for the disk drive that you are going to replace and press F4.
This puts that disk drive into service mode; the Check light on the disk drive comes on (it might be on already) and a + symbol
appears beside the entry in the list. Only one disk can be in service mode at a time.
4. Replace the physical disk drive. The
User's Handbook
for the unit containing the disk drive describes how to do this.
5. Highlight the entry for the disk drive that you are have just replaced and press F4.
This removes that disk drive from service mode.
6. Press Esc to return to the Main Menu. (Leaving the Service Aids window automatically removes any disk drive from service
mode.)
7. If the disk drive that failed was a member of an array for which no hot spare was available, the entry for the failed disk drive in the
list of members of the array is replaced with
blank Not Present
You must add the new disk drive to the array by exchanging this entry
with that for the new disk drive, using the procedure described in
"Exchanging a Member of an Array" in topic 5.5.
If the disk drive that failed was a member of an array for which a hot spare was available, the hot spare will have been exchanged
automatically with the faulty disk drive. You can either:
SSA RAID Adapter Installation and User's Guide.
Changing Failed Disk Drives
_ Copyright IBM Corp. 1996
4.3 - 1