


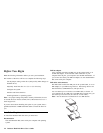


Before You Begin
Read the following information before you start your installation.
The installer of the drive will have to complete the following steps:
Set the jumper setting on the drive (and possibly make changes to
installed drives)
Physically install the drive in a 3.5" or 5.5" drive bay
Configure the system
Partition and format the drive
Install applications or operating system
Note: For jumper setting and product warranty information, be sure
to read the Deskstar Enhanced IDE (ATA-3) Hard Disk Drive User’s
Guide Supplement.
If you are unsure about installing this option in your system, have a
qualified technician or IBM authorized dealer to install the drive for
you.
Installation Requirements
To install the Deskstar hard disk drive you must have:
Documentation
The documentation that comes with your computer and operating
system.
IDE bus adapter
Your computer must have an IDE port on the system board, or on
an IDE bus adapter. If the interface cable connectors in your
computer have 40 pins, your computer uses the IDE architecture. If
you are not sure about your IDE bus adapter, see the documentation
that comes with your computer.
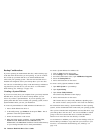
IDE cables and connectors
The IDE cables connect the IDE port on the system board, or on an
IDE adapter, to your IDE storage devices. IDE storage devices are
hard disk drives, CD-ROM drives, and tape drives.
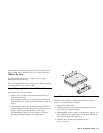
You can attach up to two devices on an IDE cable, as shown. If
your computer has two IDE ports (one IDE cable on each port), you
can attach up to four devices (two devices on each cable).
Note: Not all cables have connections for two IDE devices.
2-2 Deskstar Hard Disk Drive User’s Guide