


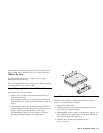

Step 6. Attaching the Cables to the Drive
Use the following procedure to attach the cables.
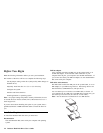
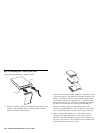
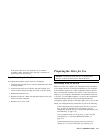
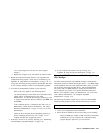
Pin 40
Pin 1
1. Locate a free device connector on the IDE interface cable in your
computer. The illustration shows an interface cable with three
connectors and two attached devices.
One end connector and the middle connector on the cable connect
to the storage devices. The other end of the cable connects to the
IDE port. The IDE port can be on the computer system board or
on an adapter installed in an expansion slot. For the best signal
quality when you have only one device on the IDE cable, connect
the device to the connector on the end opposite the IDE port.
2. Attach an available connector on the interface cable to the
connector on the hard disk drive. Be sure that pin 1, the colored
wire on the interface cable is closest to the dc power connector.
3. Find an unused power connector on a cable coming from the
computer power supply and attach it to the four-pin dc power
connector. The power connector is keyed so that it attaches one
way only. Do not force it. If the connector does not attach using
reasonable pressure, turn it and try again.
2-10 Deskstar Hard Disk Drive User’s Guide