


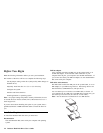

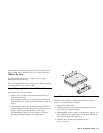
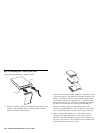

3. If you must put the drive down, place the antistatic bag on a flat
padded surface, such as a magazine, and place the drive on the
bag with the component side facing up.
Step 3. Setting the Configuration Jumpers
Your drive has four configuration positions that determine the data
transmission priority. The positions are:
Master
Slave
Cable Select
Slave Present
Use the appropriate configurations for your desired purpose:
Master
If you are installing the Deskstar as the only drive on the IDE cable or
you are replacing the master drive on the IDE cable, verify that the
jumpers are in the master configuration.
Slave
If you are installing the Deskstar as the slave drive, place the jumpers
in the slave configuration. If the existing master drive is also an
Deskstar, verify that the jumpers are in the master configuration.
If the master drive is not a Deskstar, see the documentation that comes
with the drive, check the drive label, refer to the Disk Manager Online
Manual, or call the drive manufacturer to determine if you need to
reset the jumpers. For information on how to contact the most
common hard disk drive manufacturers, see “Hard Disk Drive
Manufacturers” on page 3-13.
Cable Select
Some systems use special ATA cables with two wires reversed in the
device connectors to allow the drives to be ordered by the cable rather
than the jumper configuration. The Cable Select configuration is only
to be used for systems equipped with these special cables. See the
documentation that comes with your computer to determine if your
ATA adapter requires you to place the jumpers in the Cable Select
configuration.
If you place the jumpers in the Cable Select configuration, the IDE
cable automatically assigns the master and slave settings based on the
position of the drive on the cable. Any other devices on the IDE
cable must also be set to Cable Select.
Slave Present
Your ATA drive has a Slave Present position for the special case
when you are installing the Deskstar as master with an older and
slower slave drive that does not comply with the ATA communication
standard.
If you are installing the Deskstar drive as the master, you have a slave
device on the same ATA cable, and your configuration-setup program
does not recognize the slave drive, turn off your computer and unplug
the power cord. Open your computer. On the master drive, change
your jumpers from the Master configuration (the factory default) to the
Slave Present configuration. Then close your computer, reattach the
power cord, and restart your computer.
2-8 Deskstar Hard Disk Drive User’s Guide