


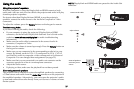


35
Power Sounds: controls whether the projector makes a sound when powered
on and off.
Audio Inputs: as
sign an audio input to a specific video/computer source
input. Press up or down to highlight the source you want to change, then
press Select or the left and right arrow keys to change the source’s audio
input. Press Menu when done changing audio inputs.
Auto Source: when
this feature is On, the projector automatically finds the
active source, checking the selected Power-up Source first. When this
feature is Off, the projector defaults to the source selected in Power-up
Source. To display another source, you must manually select one by
pressing the Source button on the remote or keypad.
Power-up Source: d
etermines which source the projector checks first for
active video during power-up.
DisplayLink Source: al
lows you to disable DisplayLink (project over USB).
When Off, you won’t be prompted to install DisplayLink software when
you connect the USB cable to your computer.
Video Standard: When
this feature is set to Auto, the projector attempts to
automatically pick the video standard based on the input signal it receives.
(The video standard options may vary depending on your region of the
world.) If the projector is unable to detect the correct standard, the colors
may not look right or the image may appear “torn.” If this happens,
manually select a video standard by selecting NTSC, PAL, or SECAM from
the Video Standard menu.
Closed Captions: c
ontrols closed caption display while audio is not muted. If
this setting is not off, and audio is not muted, and the source is NTSC and
contains captions on the selected channel, then the projector must display
caption text overlaid on the image.
Ceiling Mount:
turns the image upside down for ceiling-mounted projection.
Rear Project: reverses the image so you ca
n project from behind a
translucent screen.
Auto Keystone: aut
omatically adjusts vertical image.
Prevent PC Screen Saver: prevents your compu
ter from going into Screen
Save mode. The projector must be connected to the PC via a USB cable for
this feature to work.
Search Screen:
allows you to display a blank screen instead of the default
screen at startup, and when no source is detected.
Take Snapshot...:
captures the current image and allows it to be used as the
search screen image.
Disable Snapshot: A
llows the user to disable the snapshot capability.
Show Messages: di
splays status messages (such as “Searching”) in the lower-
left corner of the screen.
Menu Offset: allows you to change the position of the On Screen Display
items.
Menu Transparency: allows you to change how much of the projected image
behind the menu you can see. As the value increases, more of the image
behind the menu is visible.
Magnify Controls: determines whether the select key can be used to change
magnify settings when the OSD menu is not visible.
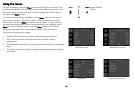
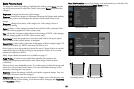
Setup menu