


43
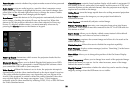
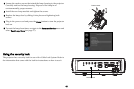
Using LitePort
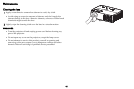
LitePort displays a slide show of JPEG images stored on a USB flash drive
connected to the projector. This feature eliminates the need for a computer
source and can be integrated with common wall plates and conference room
input/output panels.
Image File Types
LitePort displays image files in JPEG format only (file extensions .JPEG and
.JPG). Other file types including PDF, BMP, TIFF, PNG, GIF, etc. are
ignored.
Viewing a Slide Show
To view your pictures as a slide show, follow these steps:
1 Connect a USB flash drive to your computer and copy JPEG files from
your computer to the USB flash drive.
2 Turn on your projector if needed.
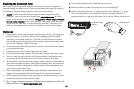
3 Remove the USB flash drive from your computer and plug it into the
LitePort connector on the rear of the projector.
4 The projector will start a slide show of the images found (if you see
image thumbnails instead, see To Start the Slide Show section below).
5 To go to the next image in the slide show, press the Down or Right
arrow button on the projector keypad or remote. To go to the previous
image, press the Up or Left arrow button.
Controlling LitePort
When you plug a USB flash drive into the projector's LitePort connector, the
projector will scan the drive and then either start a slide show or show
image thumbnails.
To stop the slide show and view thumbnails: Pre
ss the Select button during the
slide show. In Thumbnails view, the name of the current folder, the current
image number, and the total number of images in that folder are shown at
the bottom of the screen. While viewing thumbnails, press the arrow
buttons to scroll through the thumbnails, or press Select when an image is
highlighted to start the slide show, or press Select when a folder is
highlighted to open that folder.
To start the slide show:
While viewing thumbnails, press the arrow buttons
to highlight a thumbnail, then press the Select button to start the slide show
at the highlighted image.
To change the image during the slide show:
Press the Down or Right button to
go to the next image, or press the Up or Left arrow button to go to the
previous image (the slide show may also advance automatically depending
on the value of the Next Slide setting; see the LitePort Menu section below
for details).
To change to a different folder: While viewing thumbnails, press the arrow
buttons to highlight the desired folder icon, then press the Select button (to
go to the higher-level folder, select the folder icon labeled "Up").
To change LitePort settings: Pres
s the Menu button during the slide show, or
while viewing thumbnails (see the LitePort Menu section below for details).
Using the LitePort Menu
To show the LitePort menu, press the Menu button on the keypad or remote
during the slide show, or while viewing thumbnails. To highlight a menu
item, press the arrow buttons. Then to do the action or change the setting,
press Select. To remove the menu, press the Menu button again.
Rotate Picture: Rotates the current image by 90 degrees clockwise (rotation is
temporary; the image returns to its original orientation when the USB flash
drive is removed from the projector or when the projector is turned off).
Stop/Start Slideshow: Stops the
slide show, or starts it at the selected
thumbnail (when the menu is not visible, you can also stop or start the slide
show by pressing the Select button).
Go to Projector Main Menu:
Removes the LitePort menu and displays the
projector's main menu, where you can adjust the picture or change other
projector settings.