20
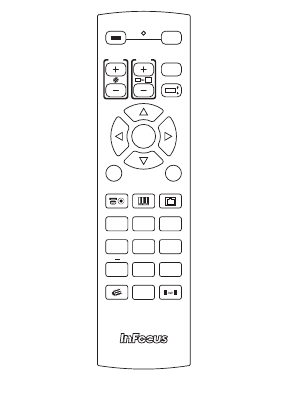
Using the remote control
The remote uses two (2) AA batteries (not included). Install batteries by removing
the cover from the remote’s back, aligning the + and - ends of the batteries, sliding
them into place, and then replacing the cover.
Caution:
• When disposing of batteries, be sure to do so in an environmentally proper
manner.
• If the remote control gets wet, wipe it dry immediately.
• Avoid excessive heat and humidity.
• Ensure the batteries’ polarity (+/-) is aligned correctly.
• Do not mix new and old batteries together, or different types of batteries
together.
• Replace the batteries as soon as they run out.
• Remove the batteries from the remote control when storing or when the
remote will not be used for a prolonged period.
To operate, point the remote at the projector (not at the computer). The range of
optimum operation is about 30’ (9m).
Press the remote’s Power On and Off buttons to turn the projector on and off
(see
page 12 for shutdown information).
Press the remote’s Menu button to open the projector’s menu system. Use the
arrow buttons to navigate, and the Enter button to select features and adjust
values in the menus. See
page 23 for more information on the menus.
The remote also has:
•Focus button turns on the focus control.
• Zoom button turns on the zoom control.
• Test Pattern button toggles between different test patterns.
•Lens Shift button turns on the lens shift control.
•Exit closes the onscreen menus (page 23).
• Input button to switch between sources.
•Picture button toggles between different picture modes.
•Network button displays network information.
• Auto Sync button resynchronizes the projector to the source.
•Aspect button toggles between aspect ratios (see page 25).
•PiP button turns on the PiP feature.
•Overscan button toggles between overscan modes.
• Freeze button freezes/unfreezes the source image being displayed.
• Lamp Mode button toggles between single and dual lamp mode.
•- button is not used on this projector.
•Info. button displays projector and source information.
•Light button turns on the remote’s backlight.
•Clear button clears the ID Set entry information.
• Shutter button to blank the screen.
•ID Set button allows the user to specify the remote and projector ID set. This
is helpful when more than one projector is used in a room. See the Setting an
ID Code for the Remote and Projector section on the next page.
POWER
ON
FOCUS ZOOM
LENS SHIFT
INPUT
AUTO SYNC
OVERSCAN
INFO. LIGHT
FREEZE
LAMP MODE
ASPECT PIP
PICTURE NETWORK
OFF
CLEAR SHUTTER ID SET
ENTER
MENU
1
4
789
5
23
6
EXIT
TEST
PATTERN
0


