


48
Confirm that the source is properly
connected.
Confirm that all units’ power switches
are turned on.
Set the input mode to “AU”.
Confirm that the camcorder is
properly connected.
Set the input mode to “AU”.
● The source (another video recorder,
camcorder) has not been properly
connected.
● All necessary power switches have
not been turned on.
● The input mode is not correct.
● The camcorder has not been
properly connected.
● The input mode is not correct.
3. Tape-to-tape editing is not possible.
4. Camcorder recording is not
possible.
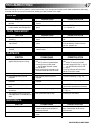
TIMER RECORDING
CORRECTIVE ACTION
Re-perform the clock and/or timer
settings.
Press TIMER and confirm that “‰“ is
displayed on the display panel.
Timer programming can’t be
performed while a timer recording is
in progress. Wait until it finishes.
Load a cassette with the Record
Safety tab intact, or cover the hole
using adhesive tape.
Remove the cassette and cover the
hole with adhesive tape, or insert a
cassette with the Record Safety tab
intact.
Check the programmed data and re-
program as necessary, then press
TIMER again.
The programme may not have been
recorded in its entirety. Next time
make sure you have enough time on
the tape to record the entire
programme.
Refer to "Guide Channel Set" and
re-perform the procedure (੬ pg. 26).
SYMPTOM
1. Timer recording won’t work.
2. On-screen timer programming is
not possible.
3. “‰“ and “]“ on the display
panel won’t stop blinking.
4. The cassette is automatically
ejected, and “‰“ and “]“ on the
display panel won’t stop blinking.
5. “‰“ blinks for 10 seconds and the
Timer mode is disengaged.
6. The cassette is automatically
ejected, the power shuts off and
“‰“ and “]“ won’t stop
blinking.
7. Video Plus+ does not timer-record
properly.
POSSIBLE CAUSE
● The clock and/or the timer have
been set incorrectly.
● The timer is not engaged.
● Timer recording is in progress.
● The timer is engaged but there’s no
cassette loaded.
● The loaded cassette has had its
Record Safety tab removed.
● TIMER has been pressed when there
are no programs in memory, or the
timer record information has been
programmed incorrectly.
● The end of the tape was reached
during timer recording.
● The recorder’s preset positions have
been set incorrectly.
OTHER PROBLEMS
CORRECTIVE ACTION
Position the camcorder so its
microphone is away from the TV.
Turn the TV’s volume down.
If you need the skipped presets,
restore them (
੬ pg. 41).
Press PAUSE to pause the recording,
change presets, then press PLAY to
resume recording.
Set the switch to TV.
SYMPTOM
1. Whistling or howling is heard from
the TV during camcorder record-
ing.
2. When scanning presets, some of
them are skipped over.
3. The preset cannot be changed.
4. The remote control won’t operate
my TV.
POSSIBLE CAUSE
● The camcorder’s microphone is too
close to the TV.
● The TV’s volume is too high.
● Those presets have been designated
to be skipped.
● Recording is in progress.
● The TV/VCR switch is in the wrong
position.
TROUBLESHOOTING (cont.)