


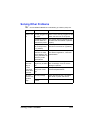

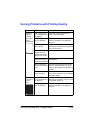


Solving Problems with Printing Quality 8-29
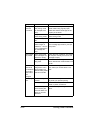
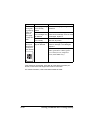
Image
defects.
The print head win-
dow is dirty.
Clean the print head window.
A toner cartridge may
be leaking.
Remove the toner cartridges and
check for damage. If it is damaged,
replace it.
A toner cartridge may
be defective.
Remove the toner cartridge with the
color causing the abnormal image.
Replace it with a new toner cartridge.
The imaging cartridge
may be defective.
Remove the imaging cartridge and
check for damage. If it is damaged,
replace it.
Lateral lines
or bands
appear on
image.
The printer is not
level.
Place the printer on a flat, hard, level
surface.
The media path is
dirty with toner.
Print several sheets and the excess
toner should disappear.
One or more of the
toner cartridges may
be defective.
Remove the toner cartridges and
check each for damage. If one or more
is damaged, replace it.
The imaging cartridge
is defective.
Remove the imaging cartridge and
check for damage. If it is damaged,
replace it.
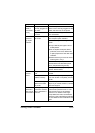
Thin white
horizontal
lines appear
at intervals
on images.
Toner is not evenly
adhering to the
media.
Perform IMAGE REFRESH. (On the
control panel menu, go to
MAIN
MENU/QUALITY MENU/IMAGE
REFRESH
, then select YES.)
If the problem persists, contact your
vendor or authorized service provider.
Colors look
drastically
wrong.
One or more of the
toner cartridges may
be defective.
Remove the toner cartridges and verify
that the toner is distributed evenly on
each cartridge roller, and reinstall the
toner cartridges.
One or more of the
toner cartridges may
be low or empty.
Check the control panel for an
X
TONER LOW
or X TONER OUT mes-
sage. If necessary, replace the speci-
fied toner cartridge.
Symptom Cause Solution