


CHAPTER 2 NAMES OF PARTS
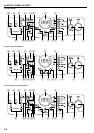
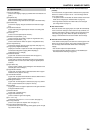
(2) Operation panel
1 Start key (indicator)
(Press to start copying. Copying is possible when the indicator is lit
green.)
2 Stop/Reset key
(Stop: Interrupts or aborts copying and printing.
Reset: Cancels settings and returns the copier in the initial mode.)
3 Size Select key
(Press when copying using the standard zoom mode. See page
4-3.)
4 Data/On-line indicator
(Lights while using the optional printer function or receiving data
from a computer.)
5 Printer key
(Press to use the optional printer function.)
6 Number of Copies/Zoom (+) key
(Press to increase the number of copies or magnification ratio.)
7 Number of Copies/Zoom (-) key
(Press to decrease the number of copies or magnification ratio.)
8 Zoom Input/Enter key
(Press when copying using the zoom copy mode. See page 4-3.)
9 Copy quantity/magnification display
(Displays the number of copies to be made and magnification ratio
for reduction/enlargement copying. When displaying a
magnification ratio, % will light.)
0 Add Toner indicator
(Lights when the level of toner becomes low. See page 3-7.)
! Memory Overflow/Data Error indicator
(Lights when the memory becomes full while scanning originals.
Also lights when an error occurs while using the optional printer
function.)
@ Paper Select key
(Press to select a drawer or the multi-bypass. The indicator for the
selected paper source will light.)
# Upper drawer indicator
(Lights when the upper drawer is selected; flashes when a paper
misfeed occurs or paper is used up.)
$ Lower drawer indicator
(Lights when the optional lower drawer is selected; flashes when a
paper misfeed occurs or paper is used up.)
% Multi-bypass indicator
(Lights when the multi-bypass is selected (see page 3-3); flashes
when a paper misfeed occurs or paper is used up.)
^ DF indicator
(Lights green when an original is placed in the DF; lights red when
an original misfeed occurs.)
& Misfeed indicator
(Lights when a misfeed occurs.)
* Image mode selection key
(Press to select the type of the original.)
( 2 in 1/4 in 1 key
(Press when using the 2 in 1 or 4 in 1 function. See page 5-1.)
) Sort key (indicator)
(Press to sort copies into separate sets. See page 5-4.)
⁄ Copy exposure adjustment keys
(Press the left key to make the copy density lighter; press the right
key to make it darker.)
● Initial mode (at the end of warm-up or when the Reset key is
pressed)
In the initial mode, the upper drawer is selected as the paper feed
drawer, the number of copies is set to “1” and the image mode is
set to “Text & Photo”.
* If the optional drawer is installed, the drawer selected in the initial
mode can be changed (see “Default drawer” on page 6-2).
* The image mode selected in the initial mode can be changed
(see “Image mode” on page 6-1).
● Auto clear function
About 90 seconds after copying stops, the copier will automatically
return to the same settings as those after warm-up. (However, the
exposure mode will not change.) Copying can be performed at the
same settings (copy mode, number of copies and exposure) if
copying is started before the auto clear function clears settings.
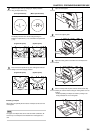
● Automatic drawer switching function
If two drawers contain paper of the same size and the paper in one
drawer runs out during copying, this function switches paper feed
from the empty drawer to the full drawer without interrupting
copying.
* This function requires the optional drawer.
* The automatic drawer switching function can be disabled (see
“Automatic drawer switching” on page 6-2).
2-4