


CHAPTER 6 COPIER DEFAULT SETTING
14
Press the Zoom Input/Enter key. The display returns to that
for step 2. To end the making of default settings, proceed to
step 17.
15
The setting code changes each time the Number of Copies/
Zoom (+) key or Number of Copies/Zoom (-) key is pressed.
Select a setting code by referring to the table shown in “1.
Default settings”.
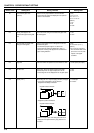
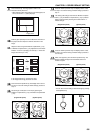
(English text panel) (Symbol panel)
16
Press the Zoom Input/Enter key. The display returns to that
for step 2. To end the making of default settings, proceed to
the next step.
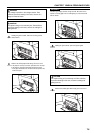
17
When “F00” appears, press the Zoom Input/Enter key. The
display indication changes from the default code to the
number of copies.
(English text panel) (Symbol panel)
* You can also end the making of default settings by pressing
the Stop/Reset key.
6-8
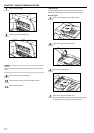
9
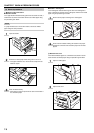
Press the Start key. The image pattern shown in the
illustration will be printed out.
* When adjusting paper feed shifting of the multi-bypass, be
sure to use 8 1/2" x 11" (letter)/A4 paper.
10
Fold the paper precisely into two to obtain the center line of
the paper and then compare it with the center line of the
image.
11
Adjust the value using the Number of Copies/Zoom (+) key
or Number of Copies/Zoom (-) key. Adjustment can be made
between -3.0 and 3.0 (changing the value by 0.1 moves the
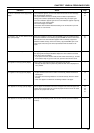
image center line by 0.1 mm).
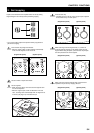
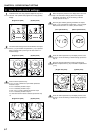
If the image looks like 1, increase the value.
If the image looks like 2, decrease the value.
12
Press the Zoom Input/Enter key. The display returns to that
for step 2. To end the making of default settings, proceed to
step 17.
13
Set the length of folio (200 to 216 mm) by pressing the
Number of Copies/Zoom (+) key or Number of Copies/Zoom
(-) key.
(English text panel) (Symbol panel)
1
2
+
–
Image center