


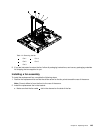

Installing the system board
Note: When you reassemble the components in the server, be sure to route all cables carefully so that they
are not exposed to excessive pressure.
Notes:
1. When you reassemble the components in the server, be sure to route all cables carefully so that they
are not exposed to excessive pressure.
2. When you replace the system board, you must either update the server with the latest rmware or restore
the pre-existing rmware that the customer provides on a diskette or CD image. Make sure that you
have the latest rmware or a copy of the pre-existing rmware before you proceed. See “Updating the
rmware” on page 211
“Updating the Universal Unique Identier (UUID)” on page 168 “Updating the
DMI/SMBIOS data” on page 170 for more information.
Important: Some cluster solutions require specic code levels or coordinated code updates. If the device is
part of a cluster solution, verify that the latest level of code is supported for the cluster solution before you
update the code
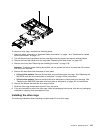
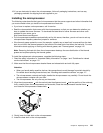
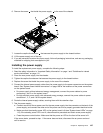
To install the system board, complete the following steps:
1. Read the safety information in “Important Safety Information” on page 1 and “Guidelines for trained
service technicians” on page 115.
2. Align the system board with the chassis, and replace the screws that secure the system board.
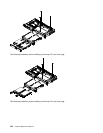
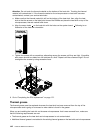
3. Reinstall the microprocessor and heat sink (see “Installing the microprocessor” on page 141).
4. Reinstall the DIMMs (see “Installing a memory module” on page 125).
5. Reinstall the DIMM air bafe (see “Removing and installing the DIMM air bafe” on page 121).
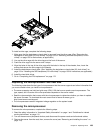
6. If necessary, reinstall ServeRAID-BR10il SAS/SATA controller (see “Installing an IBM ServeRAID-BR10il
SAS/SATA controller” on page 159).
7. Reinstall the PCI riser-card assemblies and PCI cards, if any were installed (see “Installing the riser-card
assembly” on page 157 and “Installing a PCI card” on page 132).
8. Reinstall the virtual media key (see “Replacing the virtual media key” on page 165).
9. Reinstall the hypervisor ash device (see “Installing a USB embedded hypervisor ash device” on page
134).
10.Reconnect all cables to the system board that were disconnected.
11.Install the cover (see “Removing and installing the cover” on page 119).
12.Slide the server into the rack.
13.Reconnect the power cords and any cables that you removed.
14.Turn on the peripheral devices and the server.
Important: Perform the following updates:
• Either update the server with the latest RAID rmware or restore the pre-existing rmware from a diskette
or CD image.
• Update the UUID (see “Updating the Universal Unique Identier (UUID)” on page 168.
• Update the DMI/SMBIOS (see “Updating the DMI/SMBIOS data” on page 170
).
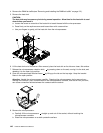
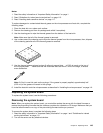
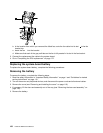
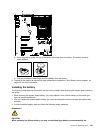
Replacing the power supply
This procedure is used when replacing a defective power supply.
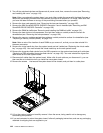
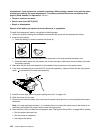
When you remove or install the power supply, observe the following precautions.
Chapter 6. Replacing FRUs 145